How to Render Realistic Pools in SketchUp with AI
My step-by-step SketchUp pool workflow: one water face, a finish and water chosen as a pair, AI caustics, real pool tile, and underwater lights in any color.
Pools are where SketchUp renders go to die. You model a beautiful backyard, drop in a rectangle of blue, and the render comes back looking like a swimming pool painted on the ground.
The problem is that water isn't really a surface. It's a window. What you see in a real pool is the finish under it, the tile at the water line, the sky reflected on top, and that net of light dancing on the floor. Get any one of those wrong and the whole yard looks fake.
So I built a test pool in SketchUp and rendered it over and over with FOCUSED AI Rendering until I had a workflow that works every time. Here's exactly how I do it now, from the first push/pull to night renders with color-changing pool lights.
Key Takeaways:
- One face does the water: a single rectangle at the water line, painted with a water material, is all the water you need to model.
- The finish sets the color: a navy pool needs a dark finish under the water, exactly like a real one, so pick the finish and the water together.
- Caustics come free: the AI draws the light on the pool floor for you, strong when the water moves and faint when it's still.
- Pool lights are their own light type: they light the water from inside, in white or any LED color you pick on the Lights tab.
- The pools and materials are ready: the FOCUSED 3D Library has 44 drop-in pools and spas, plus 30 pool waters, 24 pool tiles and 21 pool finishes at real-world size.
*Affiliate links may be used throughout this article. Read our Privacy Policy for more information.
Table of Contents
Why Pools Are So Hard to Render
A pool is three problems stacked on top of each other. The water has to be see-through and reflective at the same time. The color has to come from the right place. And the light has to move.
That last one is the killer. In a traditional rendering engine, caustics (the bright, net-like pattern sunlight makes on the pool floor) are one of the slowest effects you can turn on. A lot of renders skip them, and the pool looks dead.
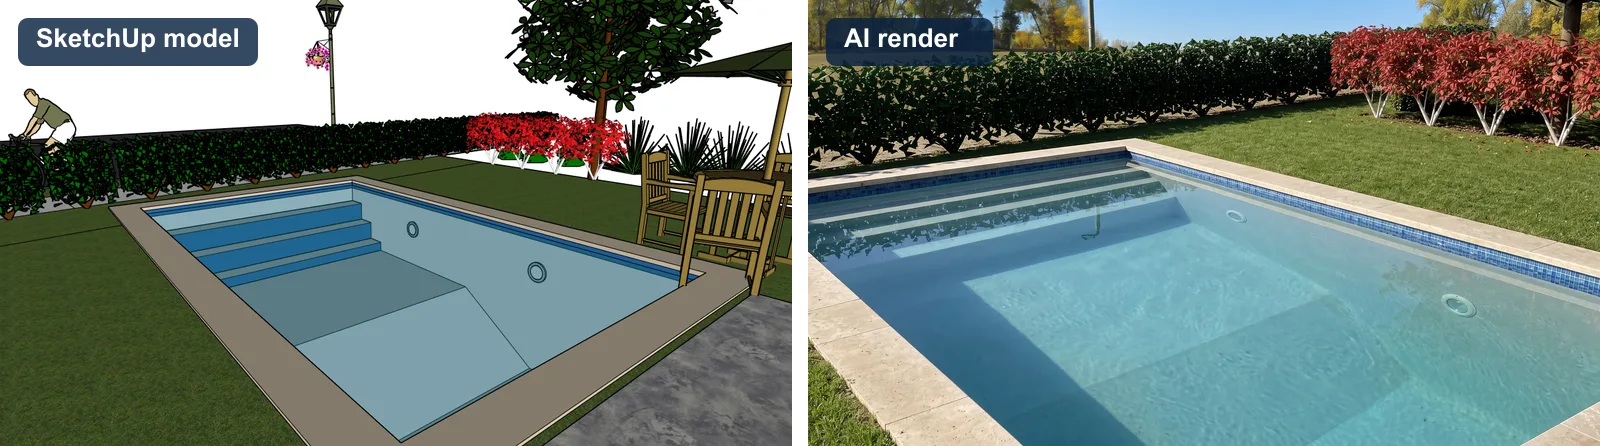
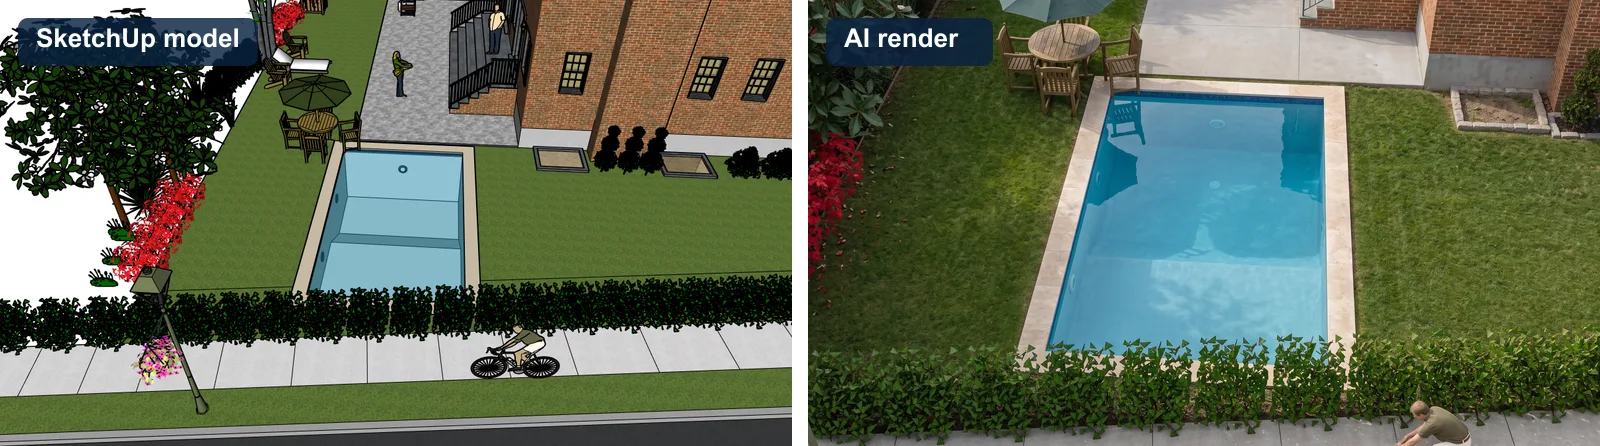
With AI rendering, all three come from the same place: a clean SketchUp model that tells the render what everything is. Here's my test pool, the SketchUp model on the left and the render on the right.
Step 1: Model the Pool Shell
Model the pool the way it's built, not the way it looks from above. That means a real hole in the deck or lawn, walls going down, a floor, and steps.
- Cut the hole. Draw the pool outline on the deck and push/pull it down to the depth of the shallow end.
- Slope the floor. Drop the deep end lower than the shallow end. The render reads depth from it, and the deep end comes out deeper in color.
- Add the steps. A few treads at the shallow end sell the scale instantly.
- Add the coping. A band of stone or paver around the edge, sitting on the deck.
- Add the waterline tile. A band about 6 inches tall at the top of the walls, so it straddles the water line.
In my test pool the water line sits 3 inches below the deck, the tile band runs 6 inches down the walls from just above it, and the steps have a tile stripe on their front edges, the way a lot of pools are built.
Or Skip the Modeling: Drop In a Ready-Made Pool
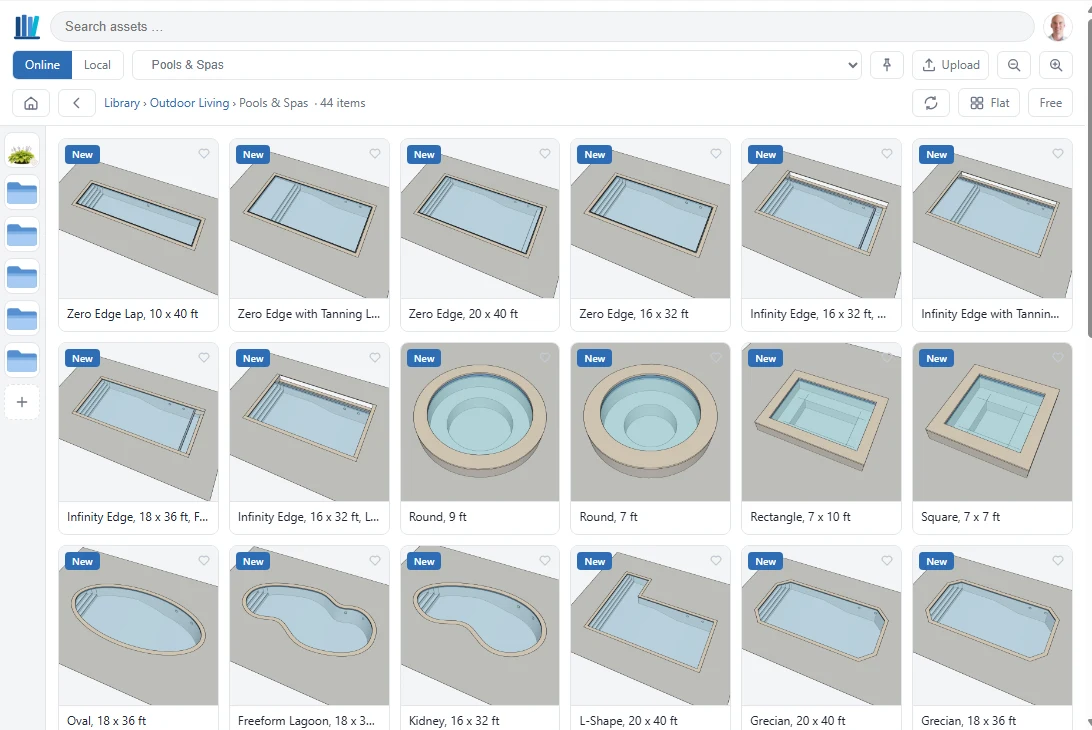
You don't have to build the shell yourself anymore. The FOCUSED 3D Library now has 44 pools and spas ready to drop in: rectangles from an 8 x 16 plunge pool to a 25 x 50, Roman, Grecian, L-shape, kidney, freeform and oval pools, infinity edge and zero edge pools, and spas.
Each one already has everything from this post in place: the water face at the water line, steps, a sloped floor, waterline tile, coping and underwater pool lights. Drop one onto your patio or lawn and it cuts its own hole. The coping, the step edge tile and the pool lights are each their own group, so you can hide them or delete them and use your own. Every surface has a material, and they're shared, so one click paints the finish, the tile or the coping on the whole pool.
Step 2: One Face at the Water Line
This is the part people overthink. You don't need a solid block of water, a glass material, or any transparency settings.
Draw one rectangle at the water line, covering the pool's outline, and paint it with a water material. That's it.
FOCUSED AI Rendering recognizes it as water, either from a FOCUSED 3D Library water or from any material with "water" in its name, and the render turns that face into real water: see-through, reflecting the sky and the yard, with the steps, tile and finish showing below it, softened by the depth.
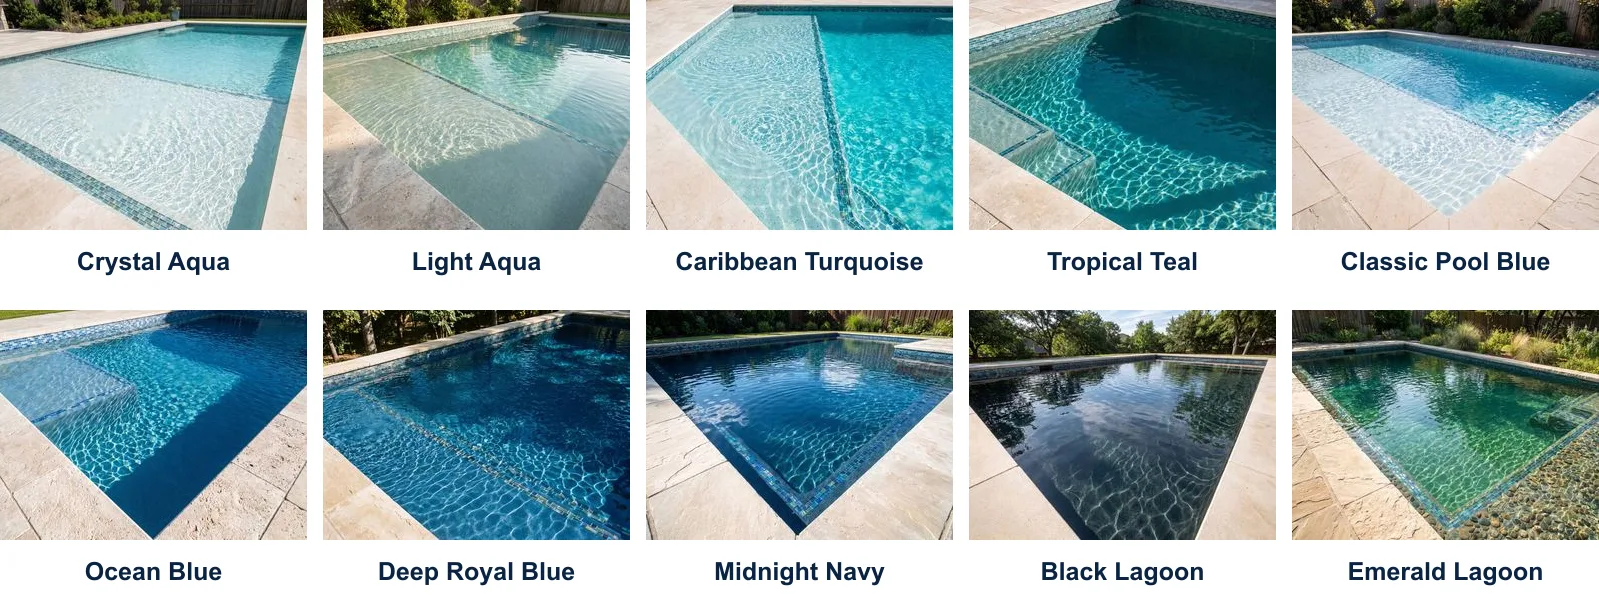
Every 3D Library pool water also comes with a word description of its color and surface that goes straight into the render. The texture you see in SketchUp is for your viewport. The words are what the AI follows.
Step 3: Pick the Finish, Not Just the Water
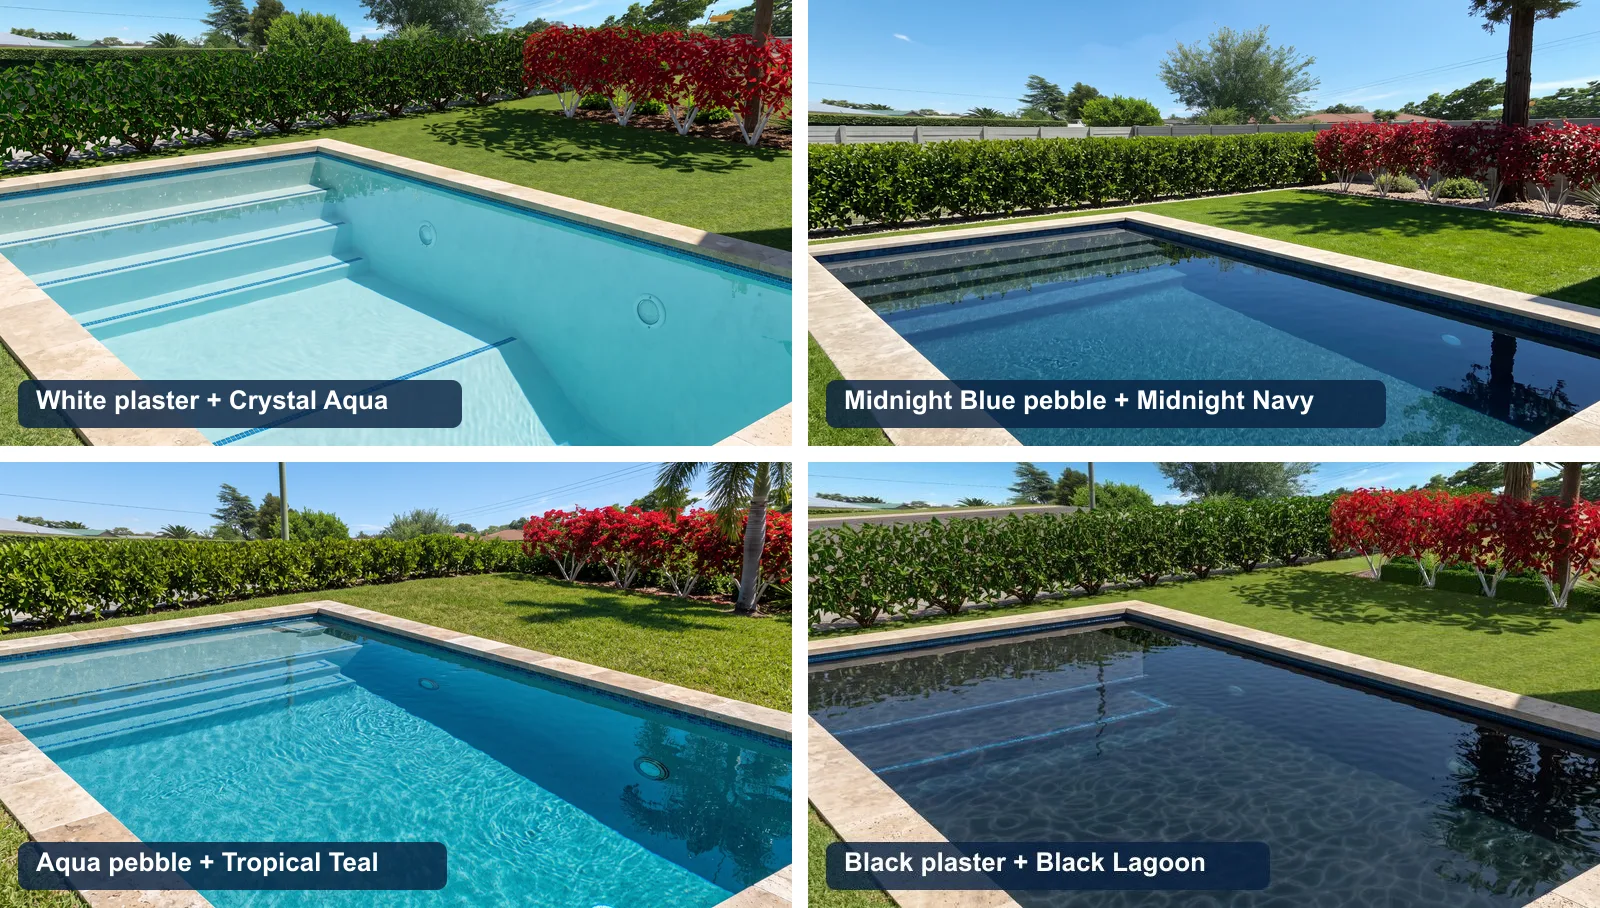
Here's what surprised me. The first time I painted the water Midnight Navy, the render came back a medium pool blue. The water was navy. The pool wasn't.
That's not a bug. It's how real pools work. A dark pool is dark because of its finish: midnight plaster, black pebble, a dark quartz. Clear water over white plaster always looks light and aqua, no matter what you call it.
So now the render is told exactly what lines the pool under the water: the finish on the floor, walls and steps, and any tile, so it doesn't carry the waterline tile down over the whole floor. You pick the finish and the water as a pair, and you get the shade you picked.
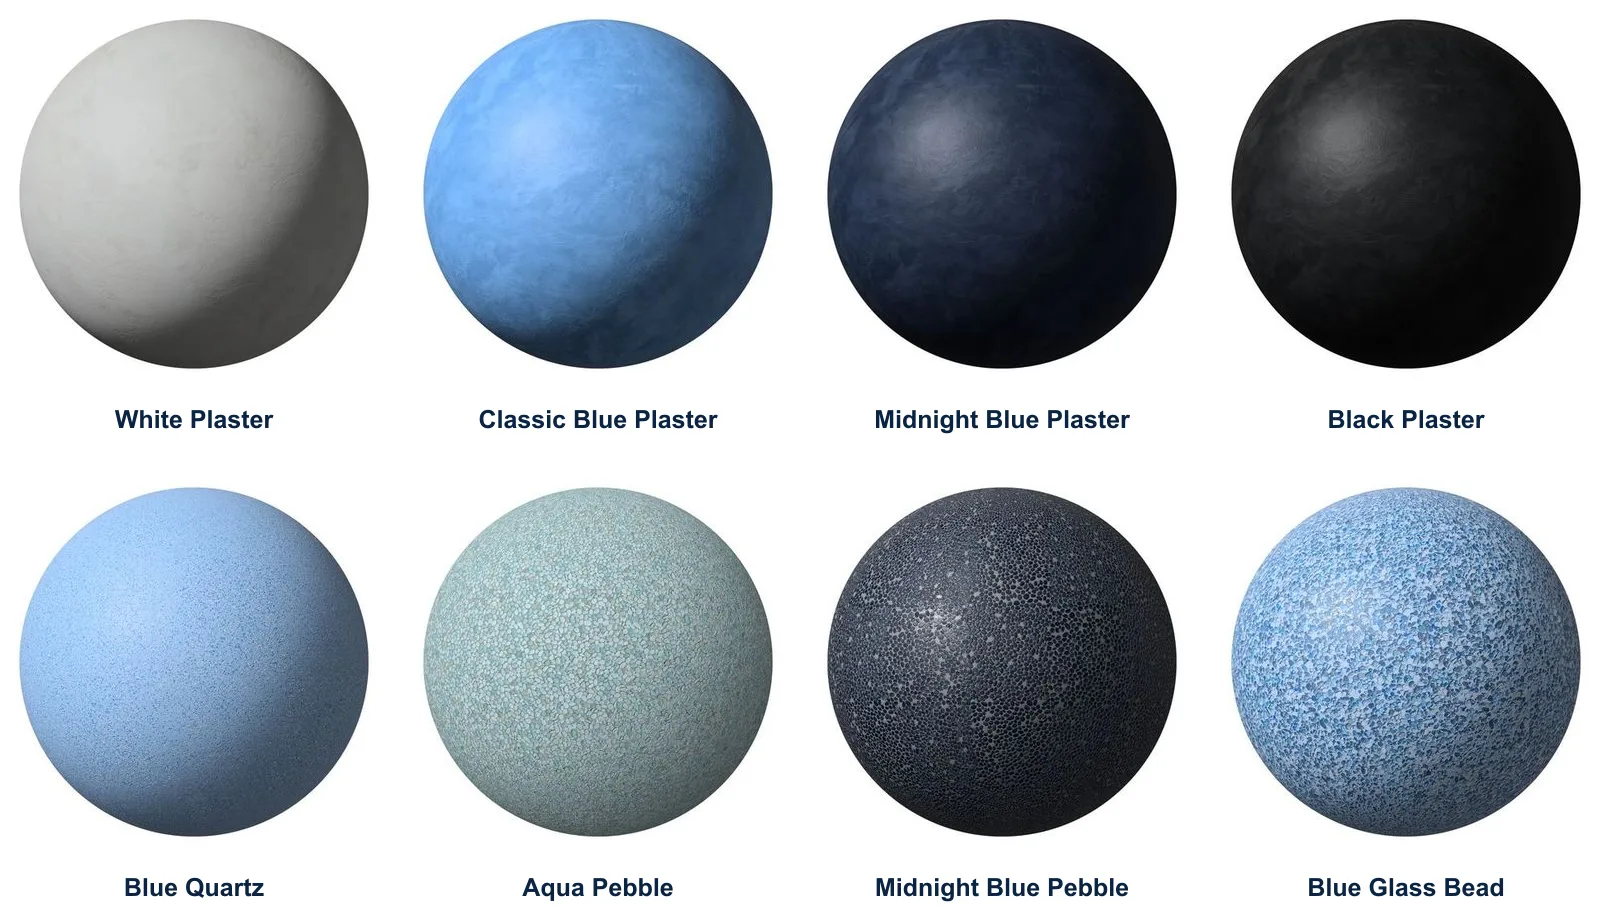
The 3D Library has 21 pool finishes: smooth plasters from white to black, quartz finishes with a fine sparkle, exposed pebble in six color blends, and glass bead. Every one comes in at real-world size, so a 1/4 inch pebble paints on as a 1/4 inch pebble.
Step 4: Still Water or Rippled
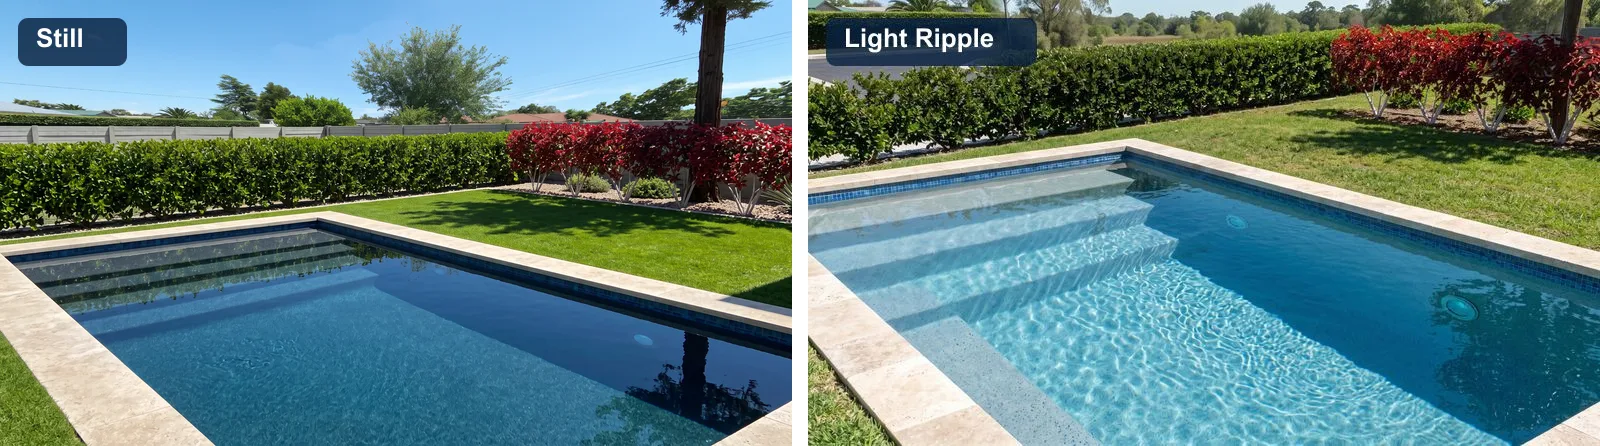
Every pool water in the library comes in three surfaces: Still, Light Ripple and Rippled. That one choice changes the whole mood of the render.
- Still: perfectly flat, a mirror with crisp reflections of the sky and the house. Best for modern, quiet, high-end yards.
- Light Ripple: small soft ripples that break up the reflections a little, with clear caustic lines on the floor. This is what most pools look like on a sunny afternoon.
- Rippled: a lively surface and strong caustics. Great for a family pool that's clearly being used.
Let the AI Draw the Caustics
You don't model caustics, and you don't paint them on. In sunlight, the render draws that net of light on the pool floor and walls by itself, and it ties the strength to the surface you picked: strong on rippled water, faint on still water.
That's the single biggest reason these renders look real. It's also the effect that used to cost the most render time.
Step 5: Tile and Coping Make It Look Built
If the finish sets the color, the tile sets the style. The waterline band, the stripe on the step edges and the coping are what make a pool look designed instead of dug.
The render follows them closely. In my test renders, the glass mosaic waterline and the travertine coping came back the way they were in the model, render after render.
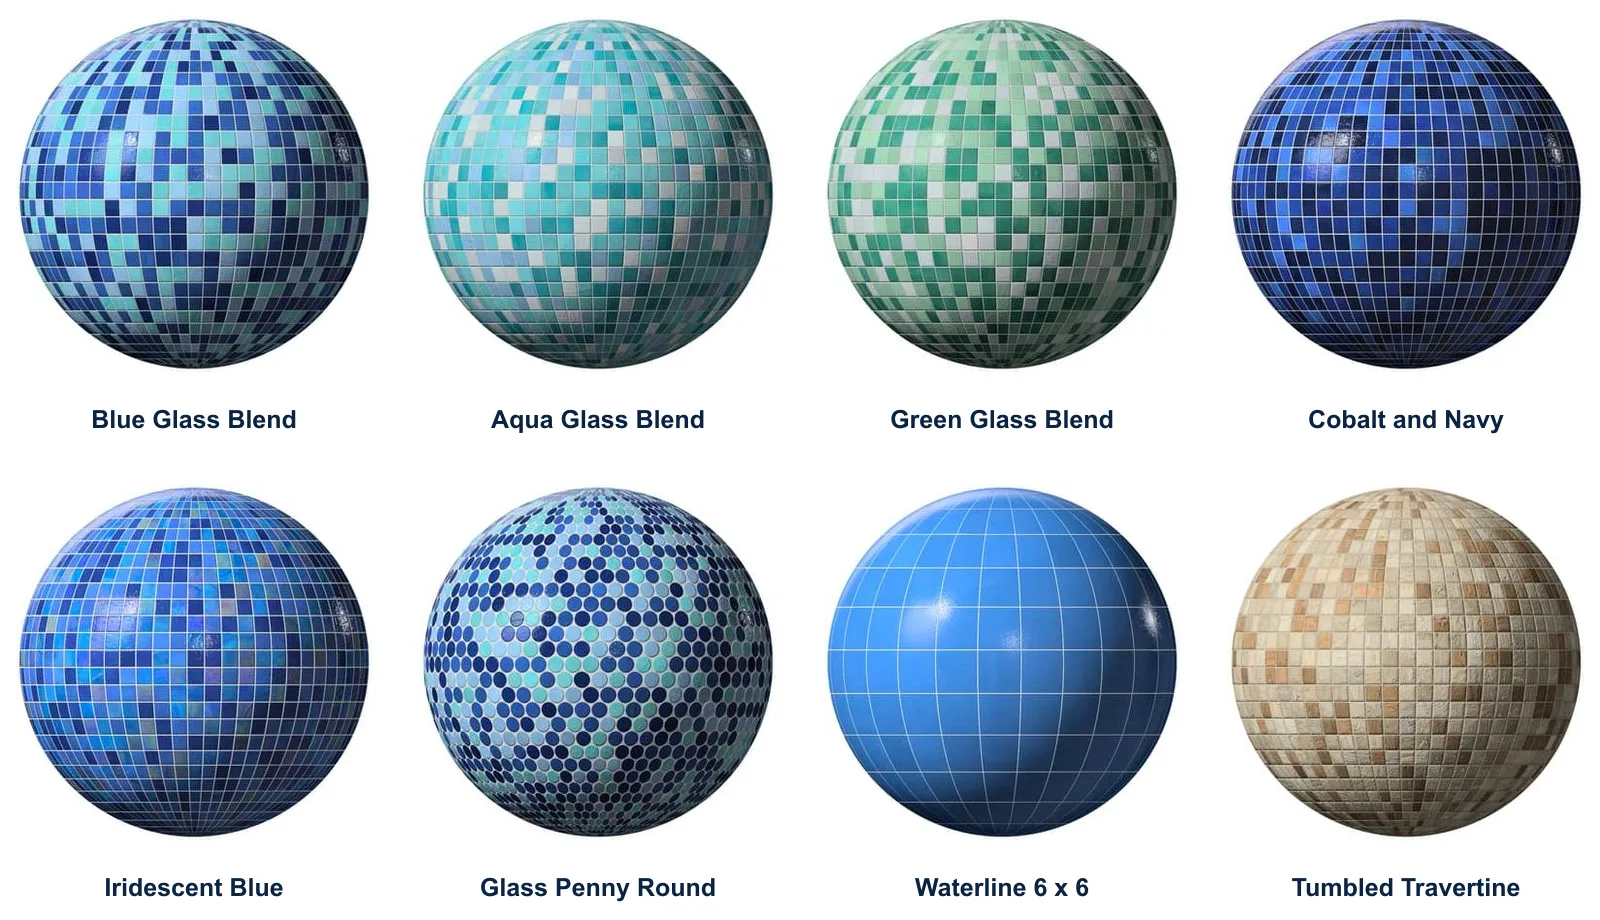
The library has 24 pool tiles: 1 inch glass mosaic blends mixed tile by tile (blue, aqua, green and light green, turquoise, cobalt and navy, teal, midnight and black, and two iridescent blends), plus 2 x 2 and 5/8 inch glass, glass penny rounds, porcelain mosaics, a 2 inch hex, 6 x 6 glossy waterline tile and tumbled travertine.
Step 6: Underwater Pool Lights
Pool lights don't behave like any other light. They sit under the water, they light the water itself instead of the air, and they throw rippling light on the floor around them. So in FOCUSED AI Rendering they're their own light type.
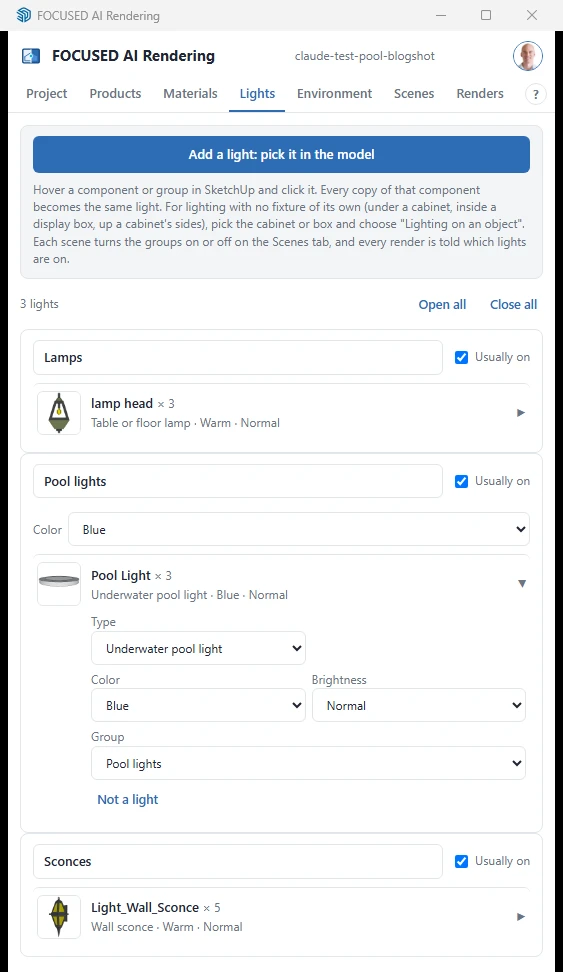
Open the Lights tab, click Add a light: pick it in the model and click your pool light component. Set its type to Underwater pool light. Components with "pool light", "spa light", "underwater" or "niche light" in their name are suggested as pool lights automatically, so most of the time it's one click.
Render It at Night
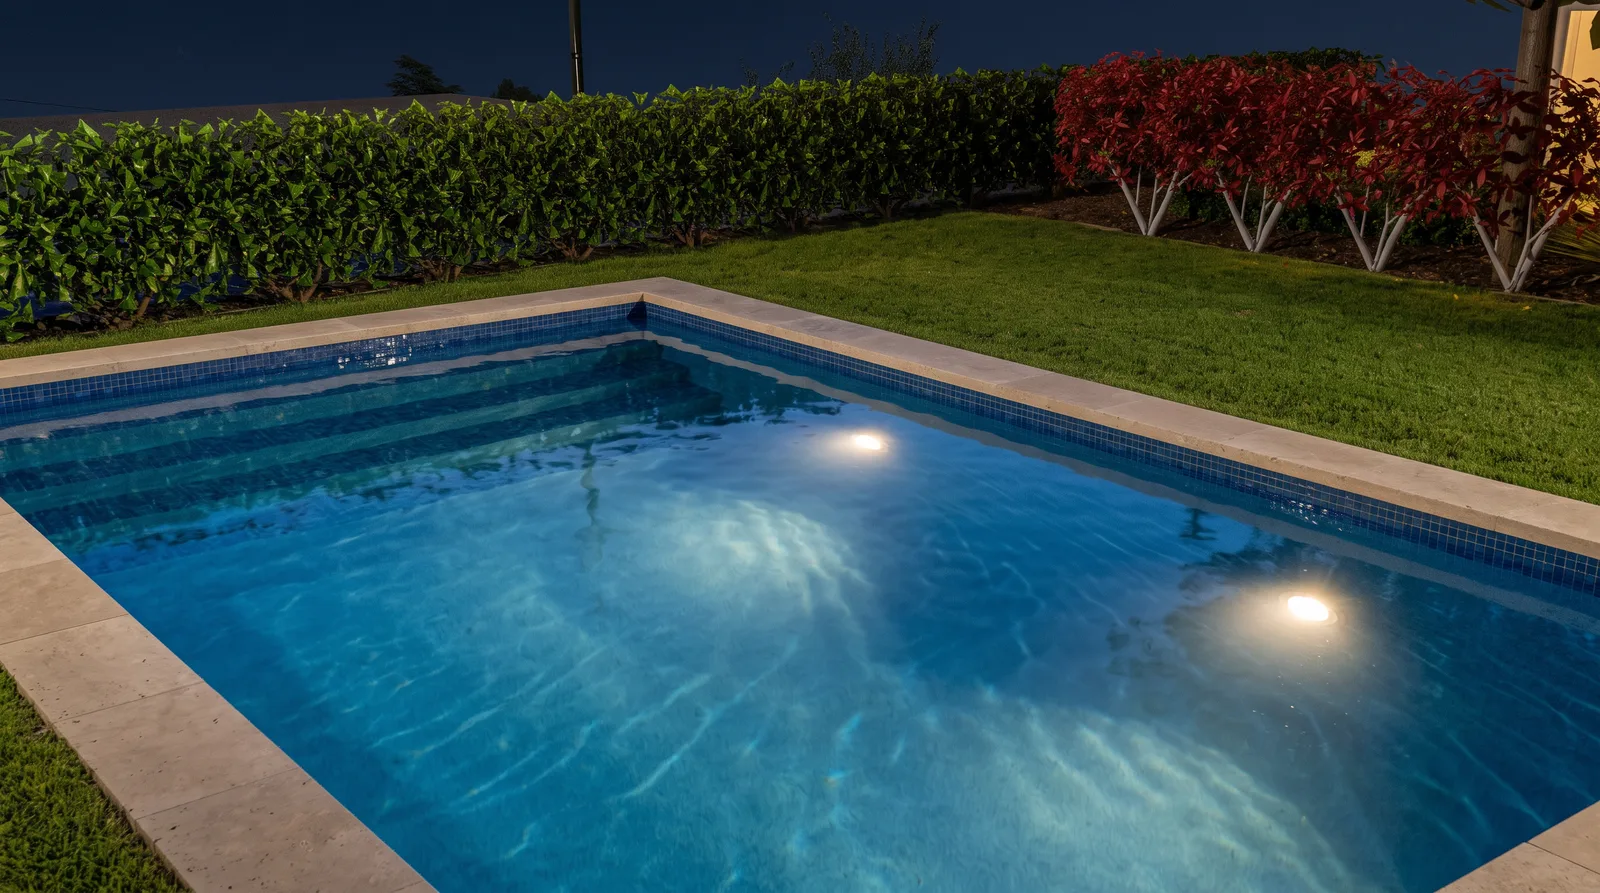
On the Scenes tab, set the scene's Time of day to Night (Dusk works great too) and make sure the Pool lights chip is on. The lens glows under the water, the pool lights up from inside, and the surface above stays dark and reflective. Nothing around the pool gets lit by them, which is exactly what you see in a real backyard.
Pick a Color
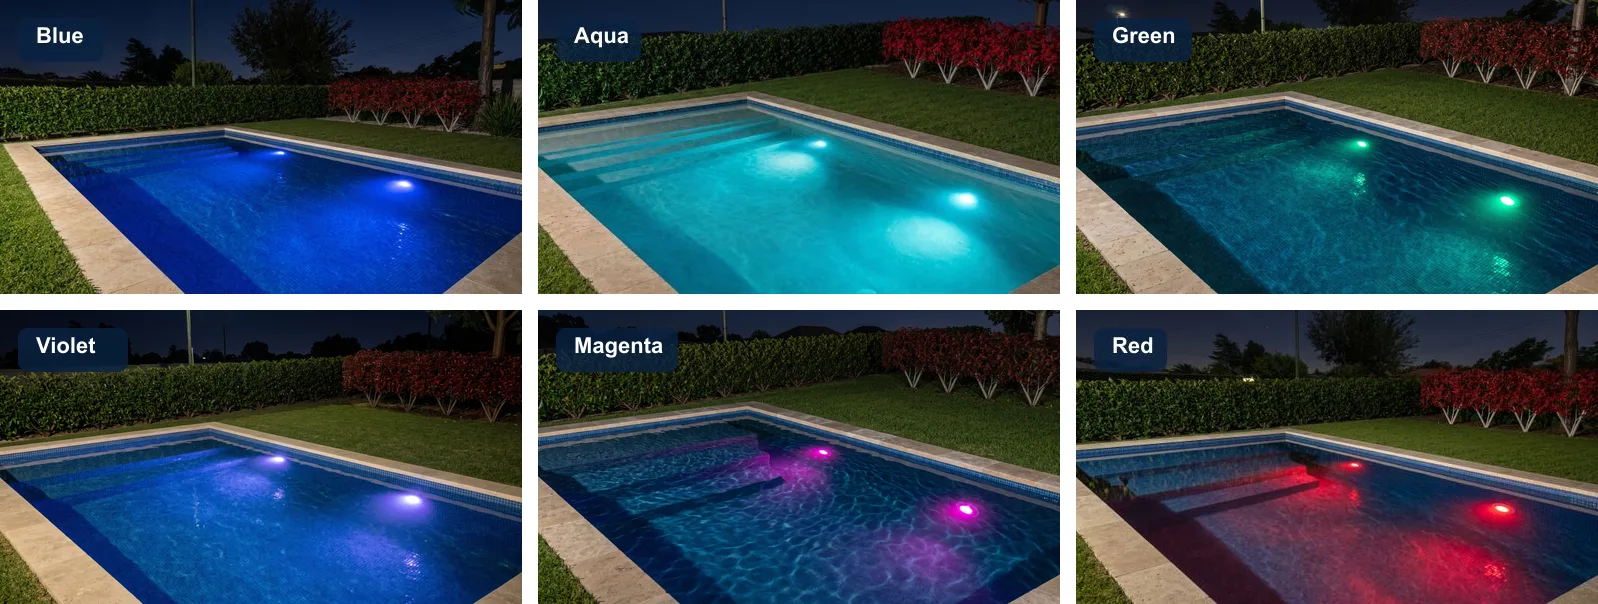
Most pool lights today are color-changing LEDs, so a pool light's Color isn't just warm or cool. You get warm, neutral and cool white, plus Blue, Sky blue, Aqua, Green, Red, Magenta, Pink and Violet.
You set it on the Lights tab. Each pool light has a Color in its row, and the Pool lights group card has a Color list that sets every pool light in the group at once. Want to show your client the options? Pick a color, render, then pick the next color and render again.
The Color Show
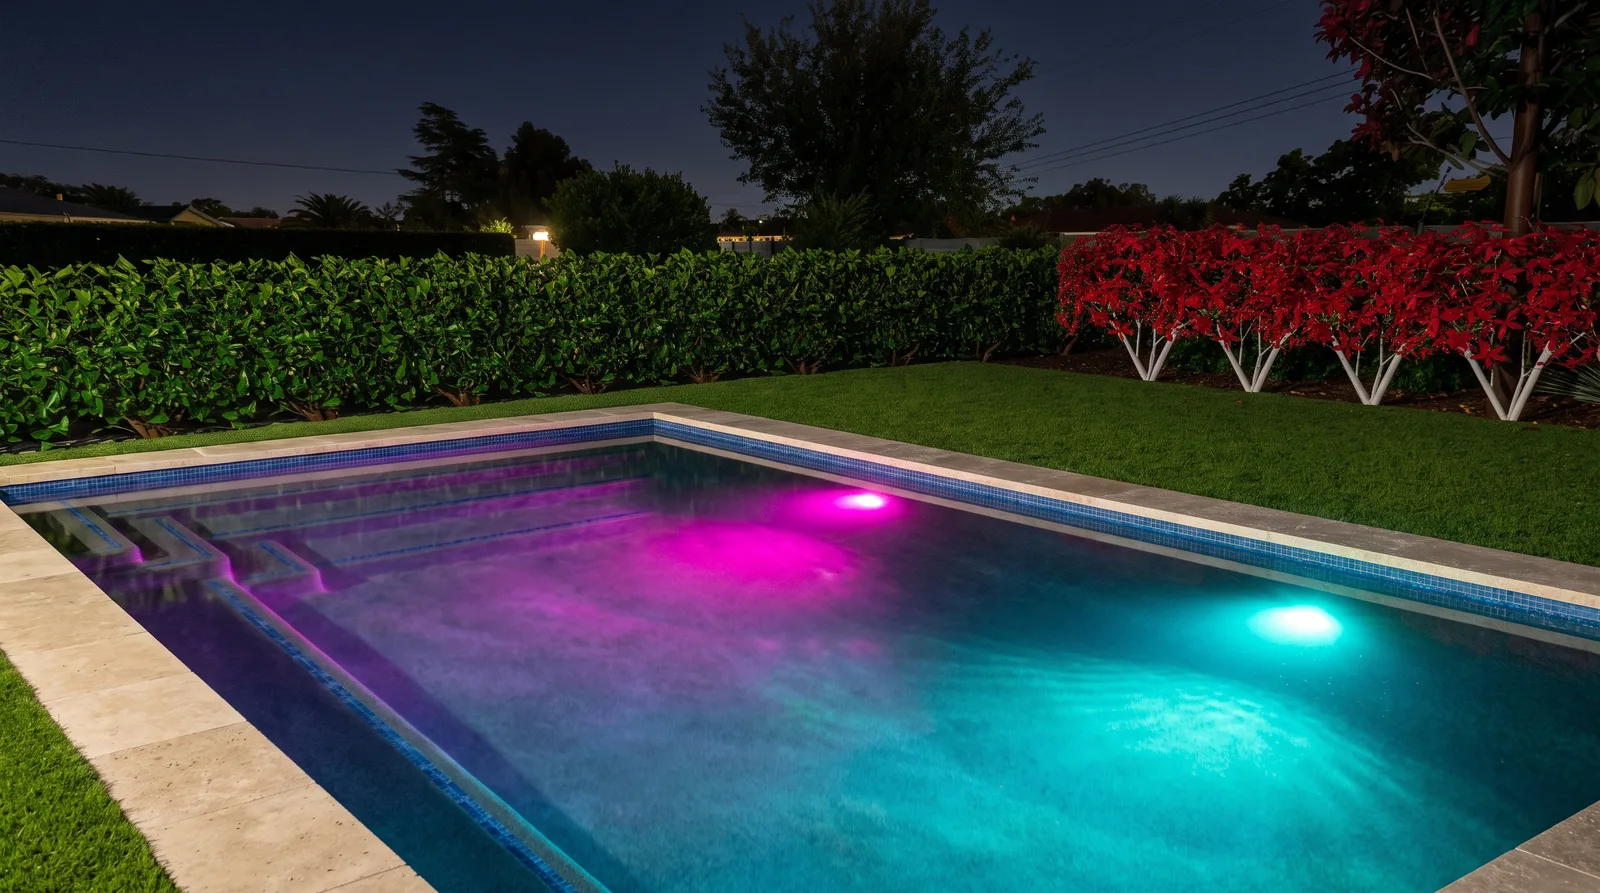
Pick Color show and each light in view gets its own color, so the pool glows magenta at one end and aqua at the other, blending in the middle. It makes a great closing image for a client presentation.
A Quick Checklist Before You Render
Before you hit Render on a pool scene, I run through the same short list. It takes a minute and saves a lot of credits.
- One water face: a single rectangle at the water line, painted with a pool water, and nothing else painted with water.
- A finish on every face under the water: floor, walls and steps, so the render knows what lines the pool.
- Tile where tile goes: the waterline band and step edges, not the whole pool, unless the pool really is fully tiled.
- The right surface: Still for a mirror, Light Ripple for an everyday afternoon, Rippled for a pool in use.
- Lights marked: pool lights set as Underwater pool lights, with the Pool lights chip on for night scenes and off for day scenes.
Where to Get the Pools and Pool Materials
Everything in this post is in the FOCUSED 3D Library, right inside SketchUp through the free FOCUSED 3D Library extension:
- 44 pools and spas: in Outdoor Living, under Pools & Spas. They cut their own hole in your deck.
- 30 pool waters: 10 colors, from Crystal Aqua to Midnight Navy, Black Lagoon and Emerald Lagoon, each in Still, Light Ripple and Rippled. They're in Landscape, under Pool & Water.
- 24 pool tiles: in Tile, under Pool Tile.
- 21 pool finishes: in Concrete & Plaster, under Pool Finish.
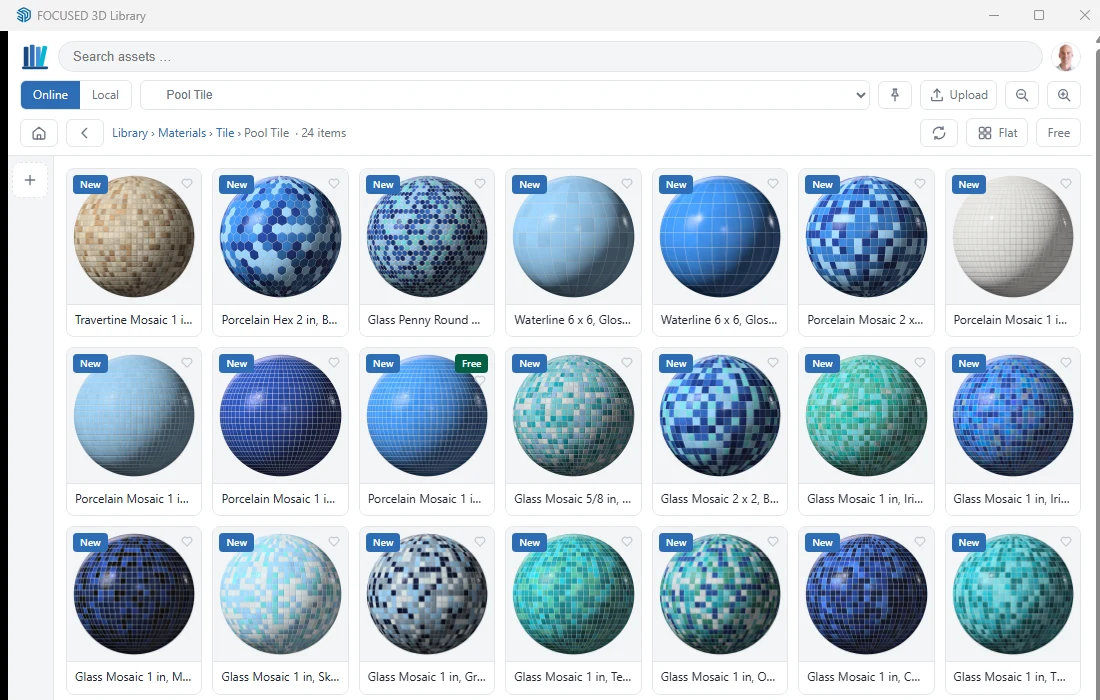
Nine of them are free with a free FOCUSED account, including the 16 x 32 pool, the 8 x 8 spa, White Plaster, Aqua Pebble and Crystal Aqua Still water. A 3D Library membership unlocks every one, plus the rest of the materials and 5,000+ premade 3D objects. Click a material in the panel with faces selected and it paints them at real-world size.
The renders themselves come from FOCUSED AI Rendering, which runs inside SketchUp and renders your scenes with the materials, products and lights you set in the model.
Frequently Asked Questions
Do I need to model the water as a solid block?
No. One flat face at the water line, painted with a water material, is all FOCUSED AI Rendering needs. The pool's walls, floor and steps underneath it do the rest.
Does FOCUSED AI Rendering add caustics automatically?
Yes. In sunlight the render draws caustics on the pool floor and walls by itself, strong on rippled water and faint on still water.
Why does my dark pool water render light blue?
Because the finish under it is light. Like a real pool, the color comes mostly from the finish, so pair a dark water with a dark finish such as Midnight Blue Pebble or Black Plaster.
Can pool lights change color in the render?
Yes. An underwater pool light can be warm, neutral or cool white, or Blue, Sky blue, Aqua, Green, Red, Magenta, Pink or Violet. Set it on the Lights tab for one light or the whole Pool lights group, and Color show gives each light in view a different color.
Are the pool materials free?
Seven of the 75 are free with a free FOCUSED account. A FOCUSED 3D Library membership unlocks all of them, along with the rest of the library.
A pool used to be the one part of a backyard I'd apologize for in a render. Now it's usually the best part of the picture. Model the shell, put one face at the water line, choose the finish and the water together, and let the lights do the rest at night. Try it on your next backyard and see what your client says when the pool lights come on.
Tags