Introducing FOCUSED AI Rendering: Consistent AI Renders, Right Inside SketchUp
FOCUSED AI Rendering turns your SketchUp scenes into consistent, photoreal renders with your real products and materials in every view — interiors, exteriors, free 7-day trial.

I've been testing AI rendering on this blog since SketchUp Diffusion came out in 2023. The pictures have gotten better every year. One problem never went away.
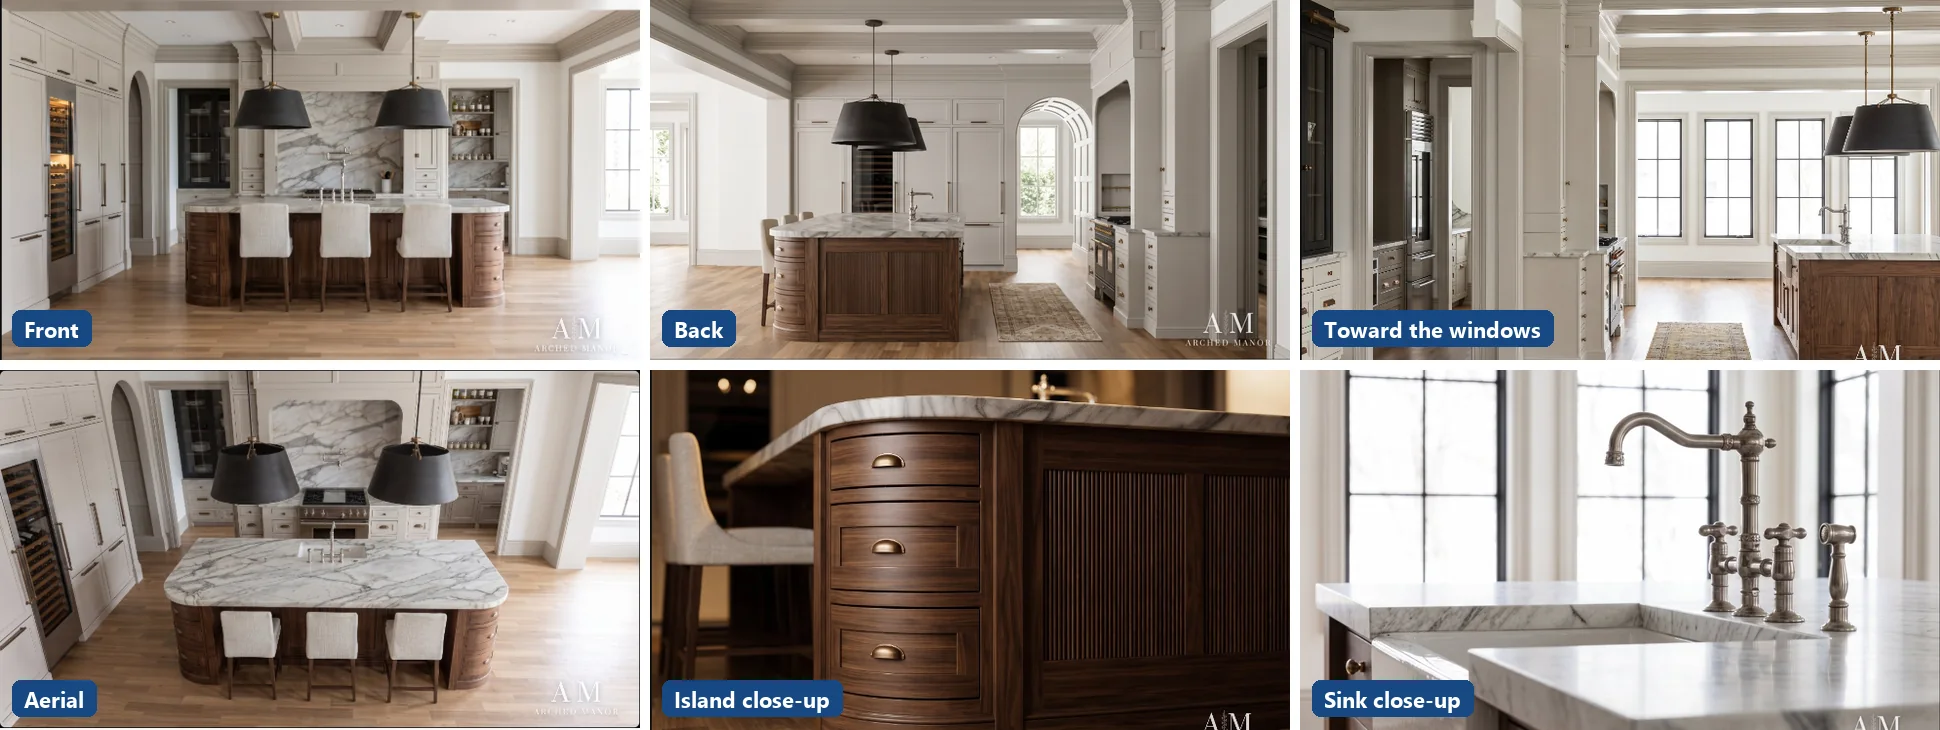
Render the kitchen from the island and the cabinets are walnut. Render it from the doorway and they're oak, the pendants are a different light, and there's a window where you never drew one. Your client doesn't see a set of renders of their kitchen. They see three different kitchens.
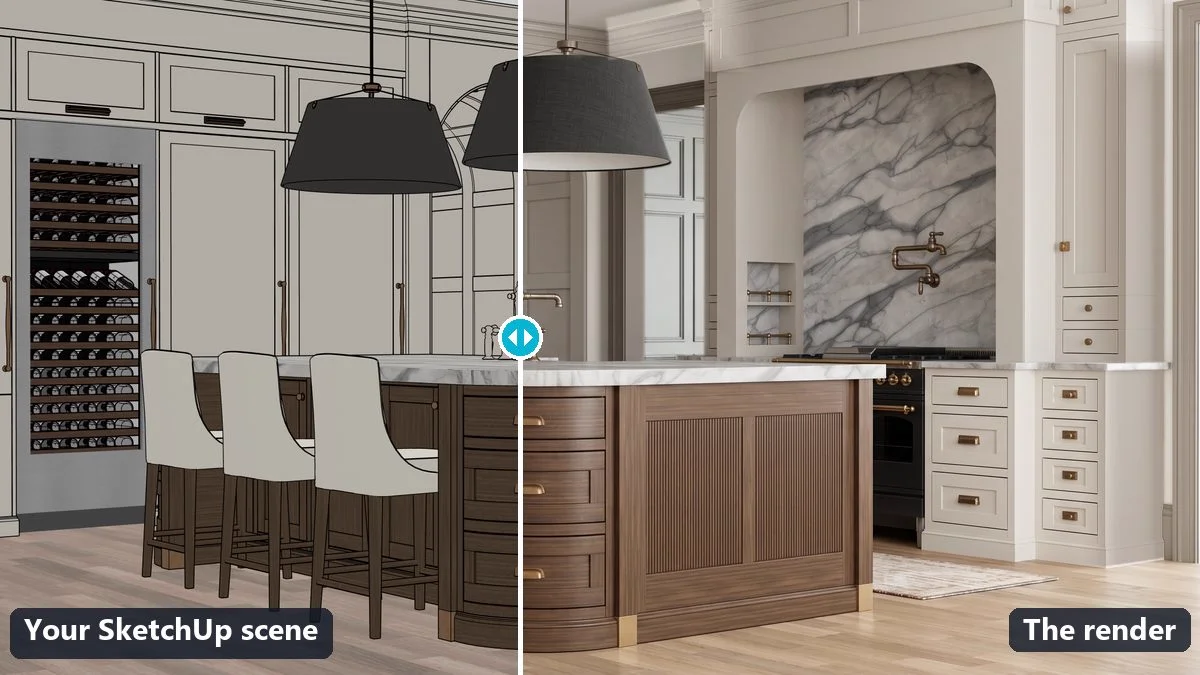
That's the problem I built FOCUSED AI Rendering to solve. It's a SketchUp extension and an online portal, it does interiors and exteriors, and it's out today with a 7-day free trial. Here's the whole idea in one picture:
Key Takeaways:
- Consistent in every scene: your real products, materials and paint colors are assigned to the SketchUp model once, so every view shows the same room.
- Your model stays the boss: walls, windows, cabinets and furniture render where you drew them, at the sizes you drew them.
- Interiors and exteriors: lights per scene and the real view out the windows inside; time of day, weather, season and one shared site outside.
- More than a render: fix one area or one object, make new camera angles and videos on the web, and send each client their own page.
- Free to try: 25 credits for 7 days, no card needed, and a render costs 1 credit.
*Affiliate links may be used throughout this article. Read our Privacy Policy for more information.
Table of Contents
Why Most AI Renders Fall Apart After the First One
A client presentation isn't one picture. It's five or ten views of one design, and every one of them has to show the same room.
That's exactly where AI rendering breaks. A typical AI renderer starts from scratch on every image: a screenshot and a sentence of text. It has no memory of what the marble or the sofa looked like in the last render, so it guesses again. You re-roll until it looks close, and the client still asks why the island changed color.
Have you ever spent more time explaining the differences between your renders than presenting the design? That's the gap this extension closes.
How FOCUSED AI Rendering Keeps Every Scene Consistent
The fix is simple to say: stop asking the AI to guess what you already decided. In FOCUSED AI Rendering, you assign your design to SketchUp itself, once, and every render reads it from the model.

Your real products
Open the Products tab, click a component in your model, and give it a photo of the actual pendant, stool or sofa you specified. The photo is attached to the component, so every copy gets it in every scene. Six stools, one photo.
Manufacturer photos work best. Edit photo crops them and removes a plain background for free. The product stays real geometry, so it renders at the size and in the spot you drew it. Nothing is faked with a flat cutout.
Your real materials
On the Materials tab, click a surface and give its SketchUp material a photo of the real finish: a slab, a sample, a supplier's swatch. Every surface painted with that material renders as that finish. Build material crops the photo into a SketchUp material at its real size in inches, and Enhance swatch turns a quick phone photo into a clean, seamless tile.
Paint colors and sheen
Paints go in by brand, name and code, and each material gets its own sheen. Flat walls, semi-gloss trim, and the two never mix. Your paint library follows you from project to project.
One look for every scene
Photo look matches every scene to one picture you love, either a render you already made or any photo on your computer. It matches the lighting and color (or the whole look and feel) without copying anything in the photo.
Render Without Leaving SketchUp
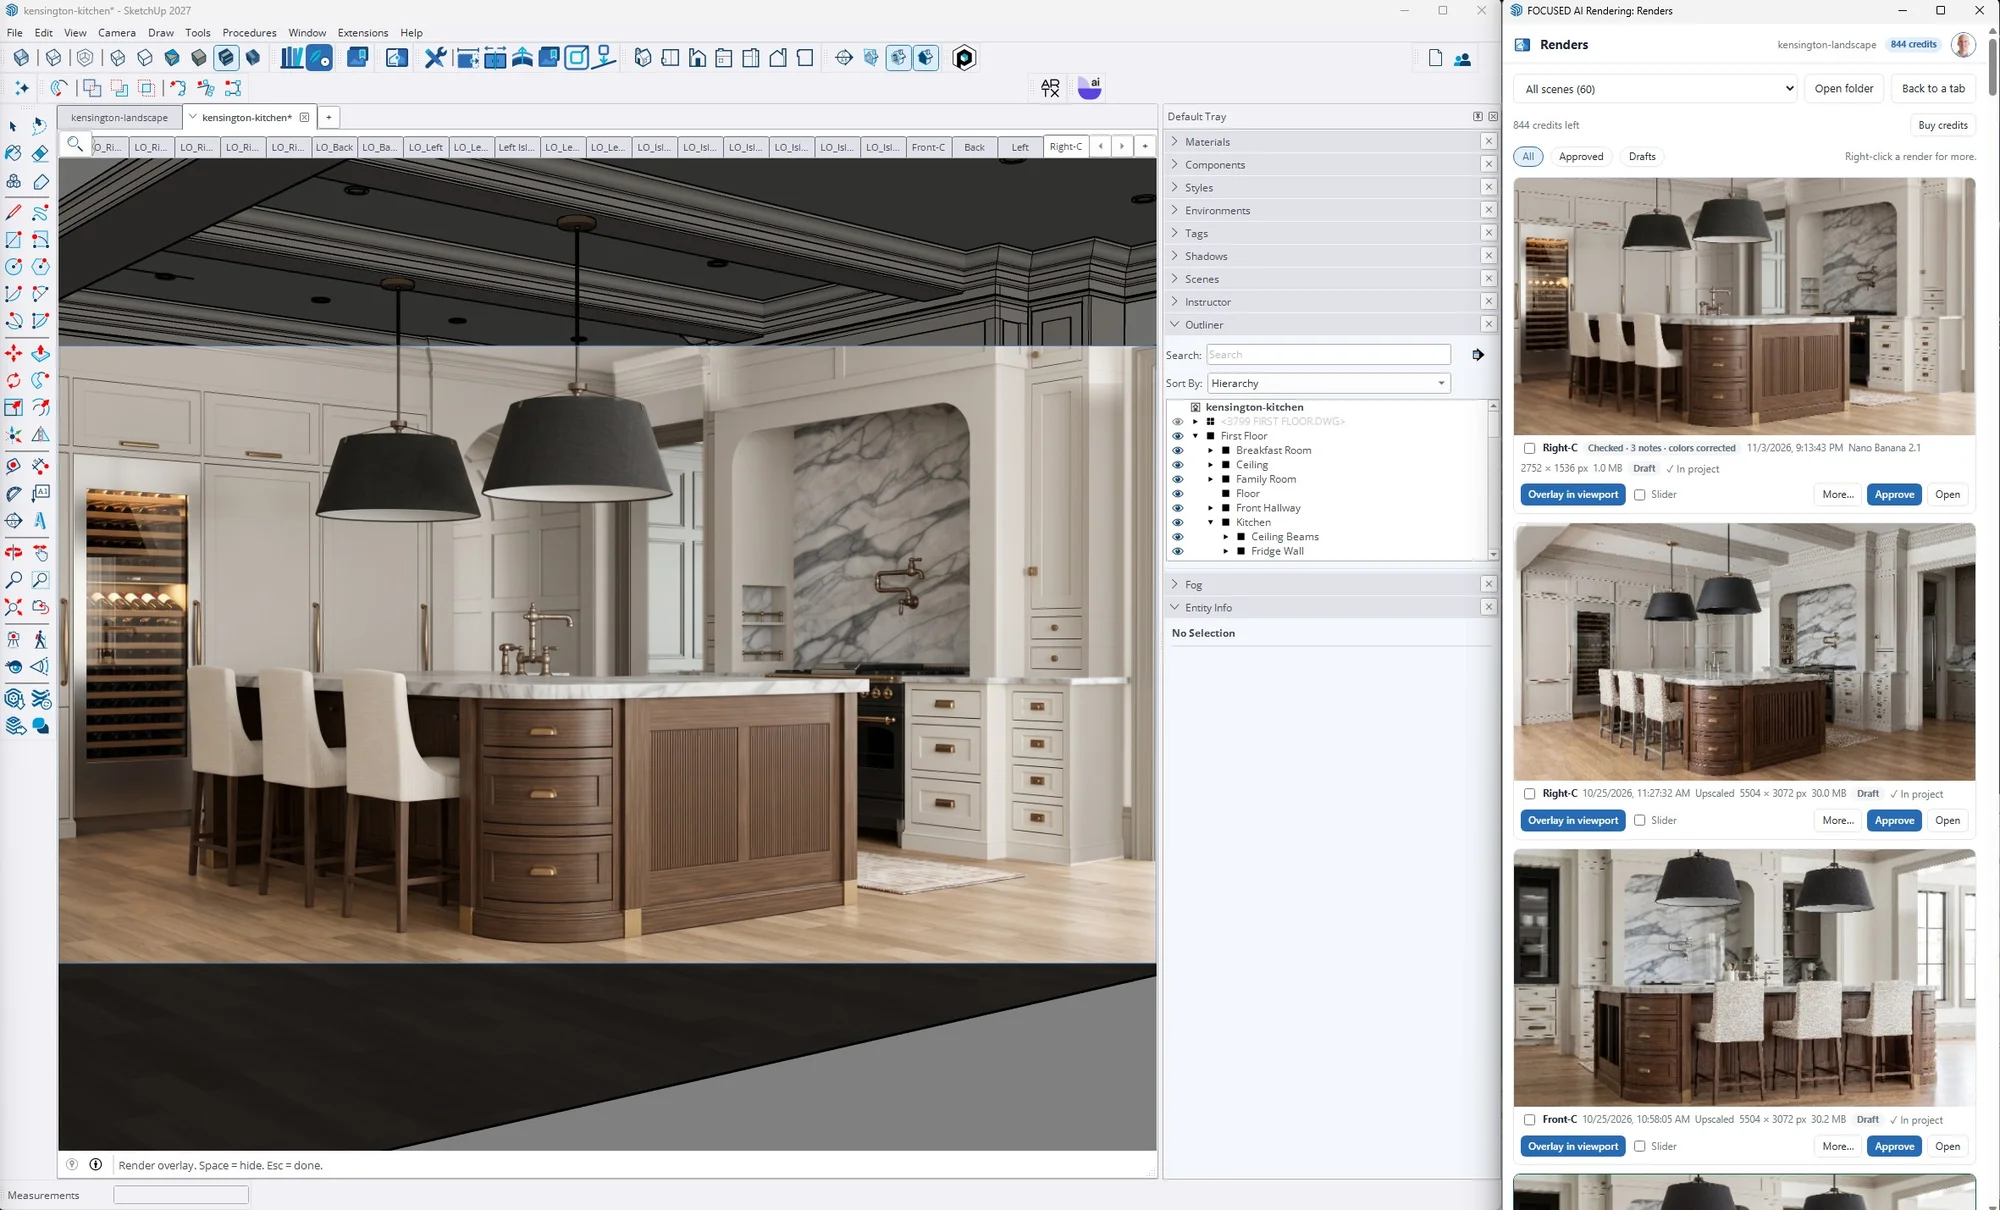
There's no exporting and no second program to learn. Open the Scenes tab, go to a scene and press Render this scene, or tick several and press Render selected. When it's done, the render is drawn right over your model so you can compare the two.
A few things that make the day-to-day faster:
- No prompts. The extension writes the instructions from your model. If one view needs something extra, add a short note to that scene, like "evening, lamps on".
- Render as one sheet. Tick two to four scenes and they go up together and come back as separate renders. It's the best way to get the same room in every view.
- No graphics card needed. Renders are made on our servers. SketchUp only exports the scene, so a regular design laptop is fine.
- FOCUSED Scene Manager included. It comes in the same download and replaces SketchUp's row of scene tabs with your scenes organized by floor, space and category. See Scene Manager.
Built for Interiors
Kitchens, baths, bedrooms and whole houses are where I've put this through the most work, and two features matter more than anything else inside a room: the lights and the windows.
Decide which lights are on in every scene
Left alone, AI decides for itself which fixtures are lit, and it decides differently in every view. On the Lights tab you mark each fixture once: recessed downlights, pendants and chandeliers, lamps, sconces, exposed and Edison bulbs, glowing panels. Lighting with no fixture works too, like LED strips under a cabinet or inside a display cabinet.
Put them in groups ("Island pendants", "Under-cabinet lighting"), set each one warm, neutral or cool, and click a chip on the scene to switch a group on or off for that view.
Put the real view outside the windows
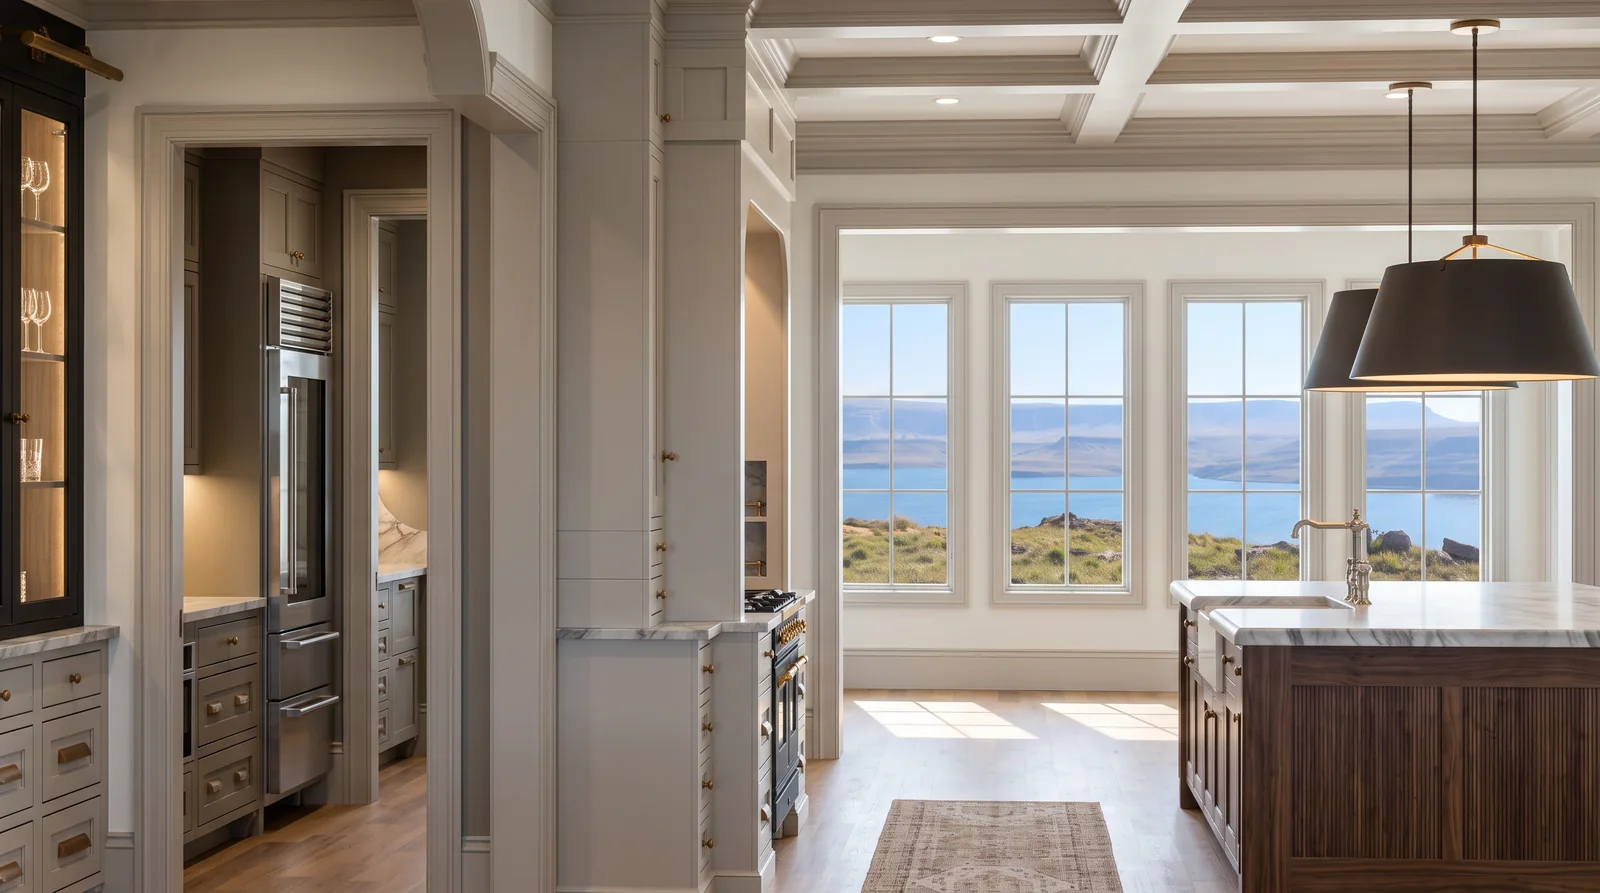
A lake house should look out on the lake. Left to itself, AI fills the windows with a typical lawn or a street. The Environment tab says what's really out there, once for the whole project: in a sentence or two, with a photo taken on site, or from the built-in HDRI library (lakes, coast, mountains, countryside, forest, city, desert and snow).
Mirrors are handled too. Name the component with the word "mirror" and it reflects the room instead of being drawn as a window.
Built for Exteriors and Landscapes Too
If you design the outside of the house, the backyard or the pool, this is for you as well. Each scene is set as Interior or Exterior, and an exterior scene gets its own rules.
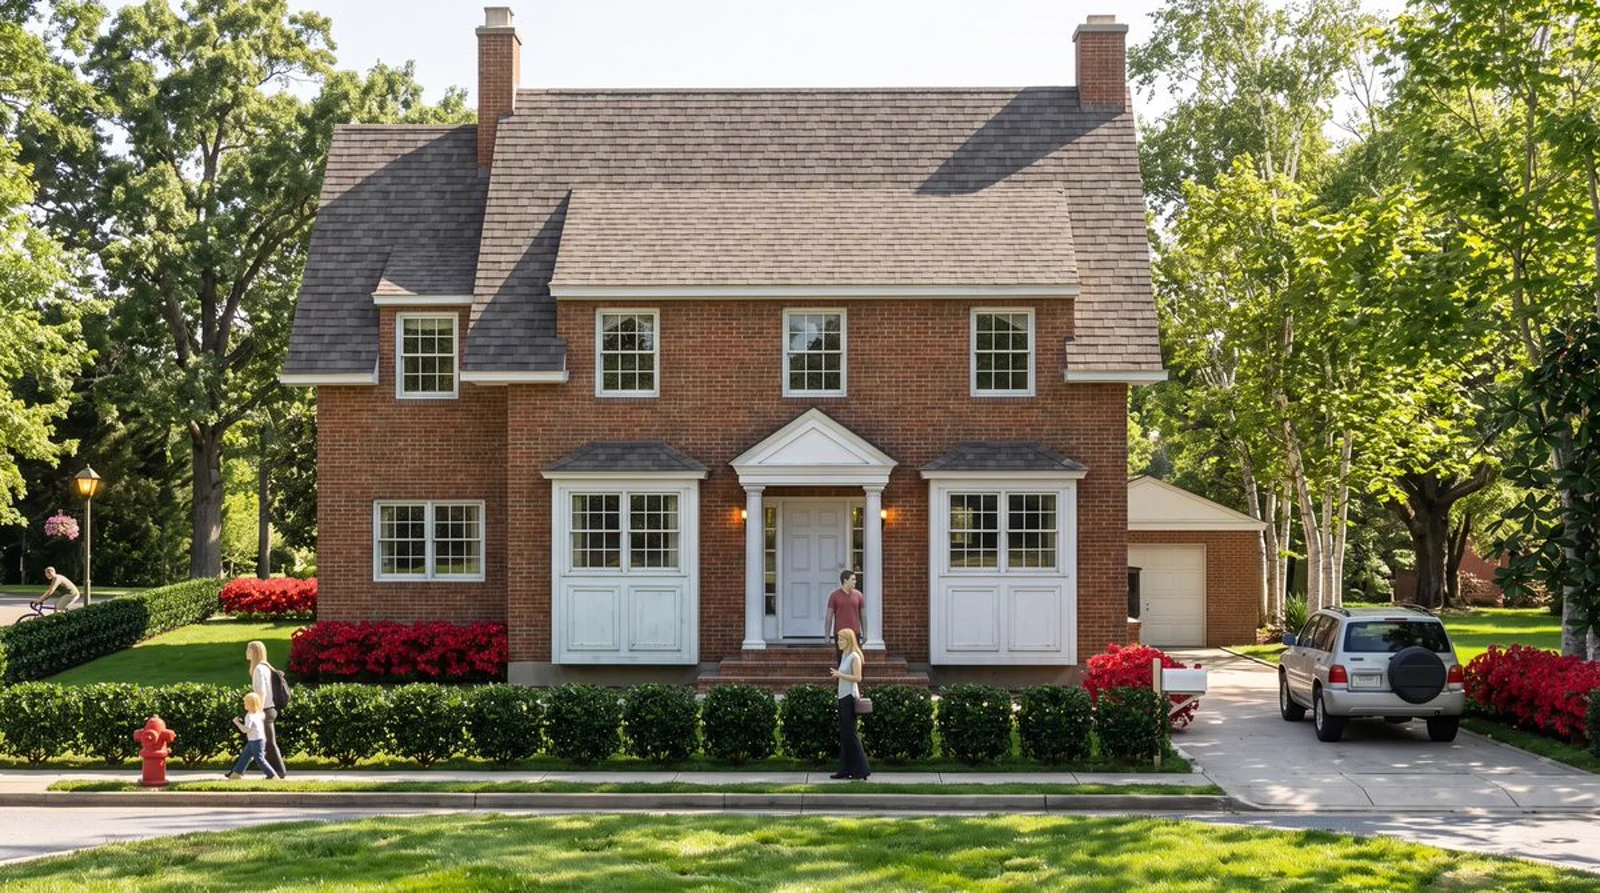
- Time of day, weather and season on every scene: clear, partly cloudy, overcast, rain, fog or snow, in spring, summer, fall or winter.
- Shadows follow the sun for the time and season you choose, so a 10 AM render in October casts October shadows.
- Your site, not a made-up one. Paving, walks, steps and site walls keep the exact outline you drew, and the people, cars and trees you modeled stay in the picture.
- Your materials outside. Brick, siding, roofing, pavers and outdoor furniture work exactly like they do inside: a photo on the material or the component.
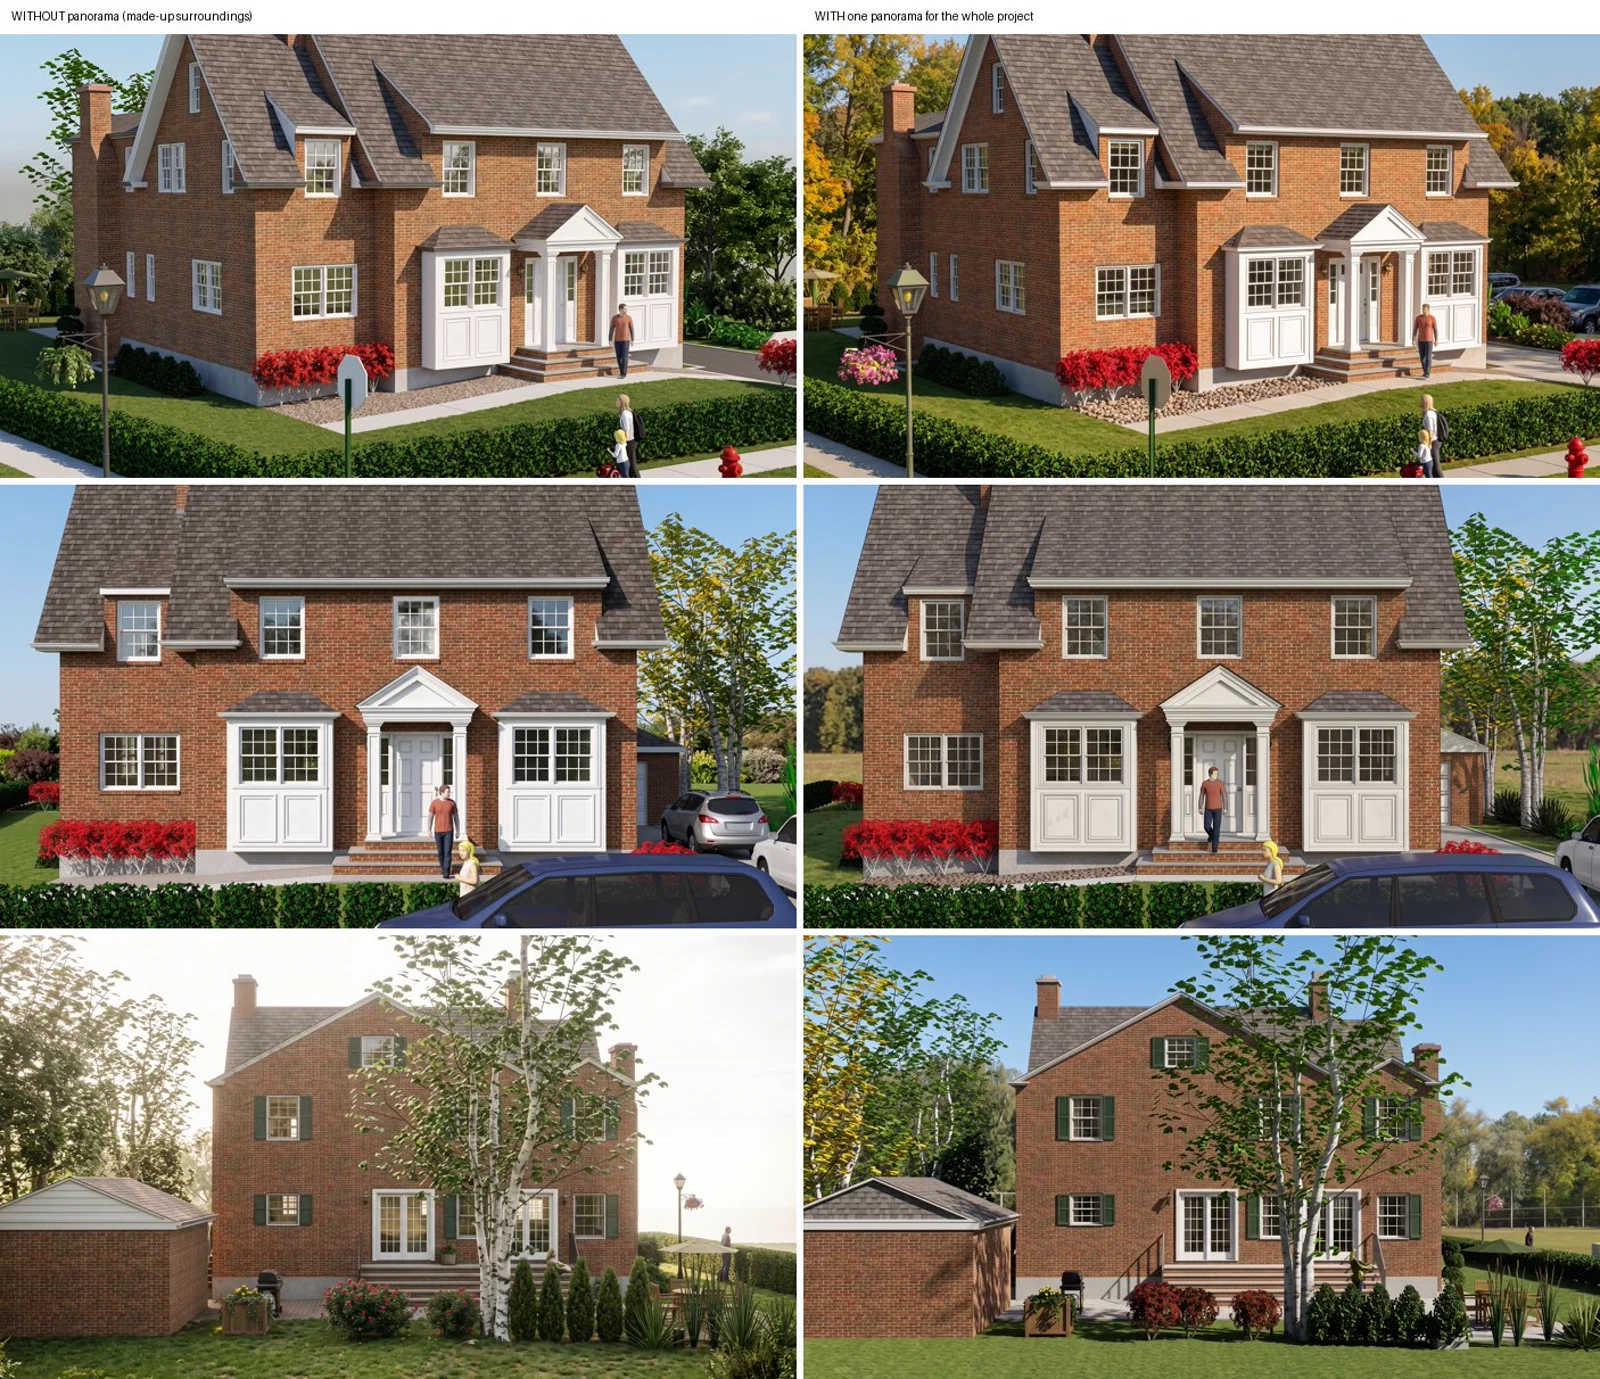
The biggest exterior upgrade is the site itself. Without help, AI invents a new neighborhood behind the house in every view: different trees, different sky, sometimes a different season. On the Environment tab, the project gets one site (its location, a description, photos and a panorama), and every view of the house is rendered against that same place. The same panorama is what your interior scenes see through the windows.
Fix What's Wrong Without Starting Over
Every AI render occasionally gets one thing wrong. With most tools the only answer is to roll the whole image again and hope the rest survives. Here you fix just the part that's off.
Fix an area
One wall came out in the wrong paint, or a panel doesn't match the one beside it? Choose Fix an area…, drag a box around it (up to four boxes) and say what it should be. You can pick the finish straight from the scene's materials. Only the boxed area is redone, and the fix is added beside the original so you can keep either.
Fix one object
A product that doesn't look like the one you specified is the fastest way to lose a client's trust. Choose Fix one object…, pick it from the list, and it's redone from its own product photo. The cabinets, counters and light around it stay put.
When a render is right, Upscale makes it 2x or 4x bigger and sharper for print or a big screen.
New Angles, Times of Day and Video From the Web
Every render files itself into its project at projects.focusedsketchup.com as a draft, organized by level and space, beside your plans, documents and paint colors. Approve the ones your client should see, from the web or from SketchUp. Approvals sync both ways.
Camera variations
Tick the renders you like and choose Create variations. Pick the shots (aerial, close-up, high angle, low angle, point of view and more) and they render side by side. These are real camera moves, not crops, and every object stays the same: the same cabinets, the same number of stools, the same finishes. Exteriors get their own shots: street, corner, drone and twilight.
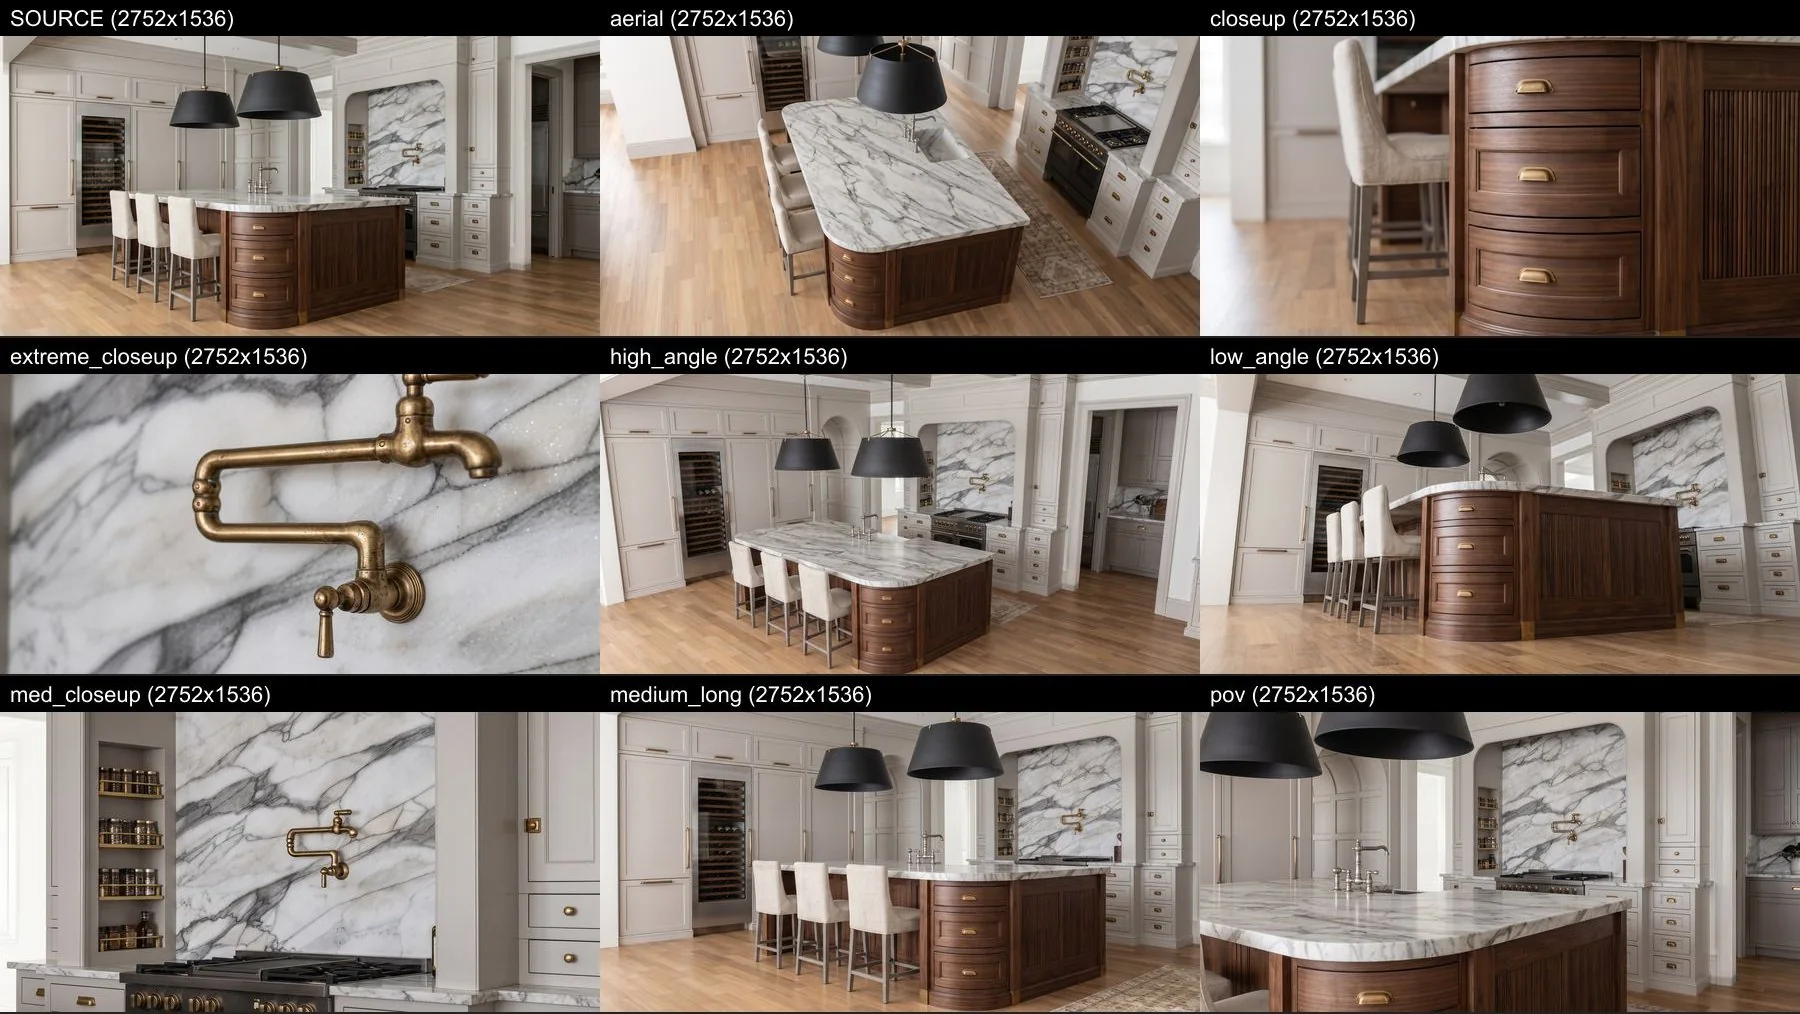
The same page makes times of day (morning, midday, golden hour, dusk or night), weather and seasons, and other shapes from a 1:1 square to a 9:16 story. Every variation is checked against the render it came from. One that changed the room is made again once at no charge, and if it still differs, its credit comes back.
Video
Right-click an approved render and choose Make video. The camera pushes in, pulls back, or travels to another render of the same room, in 720p or 1080p. Because videos come only from approved renders, every frame shows a room you already checked.
Join several clips into one film with an opening title, your logo and one of 25 background tracks, and play it across the top of the client page.
A Client Page for Every Project
This is the part none of my old rendering tools ever did. Every project can have its own page on yourrenders.com with your logo. No portfolio site to build and no folder of files to email.
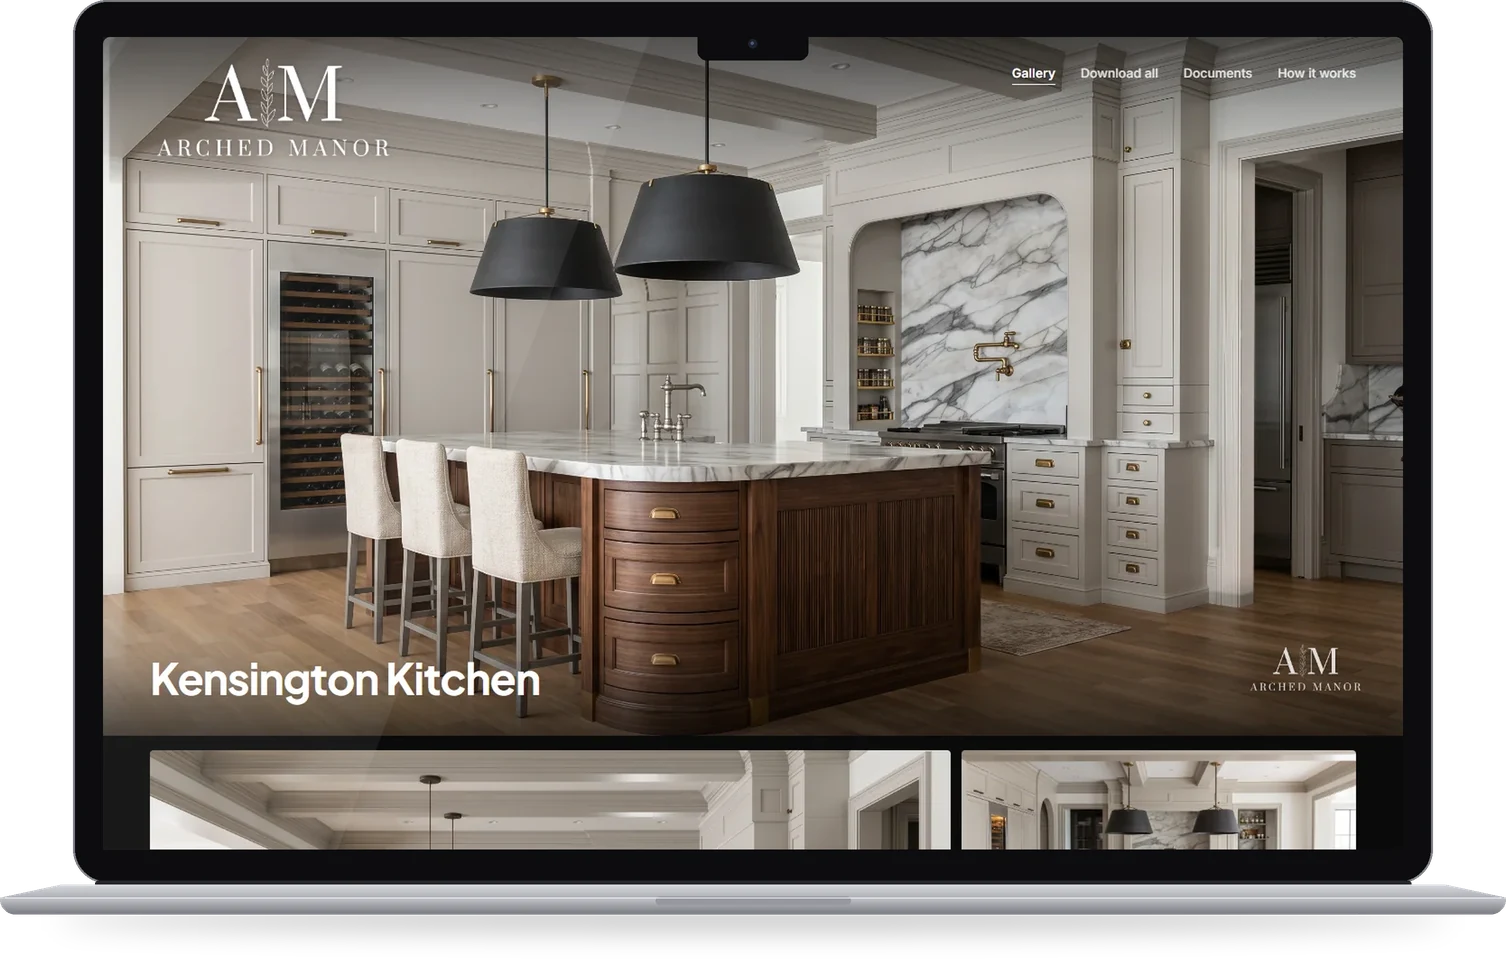
- Only the renders and videos you approved, plus your design documents in a page-turning viewer.
- A whole house sorts itself by level and space, with a bar at the top to jump between them.
- Your logo as a watermark on every picture and every download, plus a password, a draft mode and a personal link for each client.
- Clients drop a pin, a circle or a drawing on a render with a comment. You get an email that goes straight to that spot, and every comment lands in one Inbox across all your projects.
No more "the light on the left, no, the other left". If you charge for renders, this is also where your presentation starts to look like the fee. (I wrote about that in how much to charge for 3D renders.)
How It Compares
Designers come to this from two directions. Some use a traditional render engine like V-Ray, Enscape or D5. Others have been dropping SketchUp screenshots into ChatGPT or another general AI image app. Both of those make sense, and both leave a gap.

A traditional engine gives you control and consistency, at the cost of hours of material and lighting setup and a strong graphics card. A general AI app is fast, but it reinvents your room in every render and often redesigns your layout. FOCUSED AI Rendering keeps your design the same in every scene without the setup, checks every render for wrong colors and objects and fixes what it finds, then does everything after the render too: the project portal, the videos and the client page.
And it isn't "good for concepts, use V-Ray for finals". These are client deliverables. That's exactly what the beta testers used them for.
What the Beta Testers Said
In November, a group of FOCUSED students and working designers rendered their own projects with it for the beta. Here's what all seven surveys and written reviews came back with:

Tara P. runs design communication between designers, contractors and homeowners:
My team and I have been using V-Ray and/or Enscape for our renders in the past, but from what I've seen with FOCUSED AI Rendering we'll be making the switch. It honestly combines 3-4 steps of my workflow into one. And it works!
Dawn G. does high-end residential renovations, and she recorded a video review too:
I was using Enscape and Vray. Focused AI rendering was so fast and easy to use. I liked that I didn't have to spend time with lighting in my model, special textures etc.. I like that I could focus on creating my model and the extension would do the rest.
Christina K. designs new construction homes for developers:
I was using Sketchup scenes to Chat Gpt before. This is definitely a step up!! I am very impressed and happy with the ease of use, speed and the end result!
Melissa M., a design consultant for a home building and renovation company:
It takes the models I'm already creating and brings them to life, turning a standard Scene into something clients can immediately connect with. Instead of walking them through the vision piece by piece, the image does much of that work for them.
Carina M. took my Kitchen Design course with V-Ray earlier this year:
I really like this a lot better. The results are very professional and beautiful! It's a lot easier to use, and it's an 'all-in-one' rendering package…
Mark B., who designs commercial interiors and custom furniture and used Enscape and Magnific before, gave it four stars:
He's taken a lot of the tedious prompting and 'hoping' of AI rendering out of the process and created a useful tool and extension for getting nice renders out of your model. With a half-day of training effort and a little trial and error this extension will help you streamline your workflow and improve visual results.
And Jim K., who designs higher-end lake and mountain homes, also gave it four:
Focused AI Rendering certainly opens up the possibility of creating and sharing many more renders than I have been able to using basic AI. It also forces me to be much more clear with my material selections and my prompts.
Testers got free early access. A written review and the survey earned a free month, and a video review two more, whatever the review said. Quotes are word for word, with each tester's permission. Read all the reviews.
How the Free Trial Works
A new account gets 25 credits for 7 days, whichever runs out first, and no card is needed. During the trial you have everything a Studio plan has, client pages included, so you can try the whole thing on a real project.
- Download the extension and install it from Extensions → Extension Manager in SketchUp 2026 or 2027, on Windows or Mac.
- Sign in with your FOCUSED account. The trial starts there.
- Save your model and link it to a project on the Project tab.
- Add photos to your two or three biggest finishes (usually the floor, the cabinets and the countertop) and your key products.
- Go to a scene and press Render this scene.
A render costs 1 credit, so 25 credits is plenty to render a room from several angles, fix a few things and try a camera variation. A render that fails costs nothing.
Help Guides for Every Feature
Everything above is written up step by step, with screenshots and short clips, in the FOCUSED AI Rendering Help Center. Sign in with your FOCUSED account to open them:
- The one-page quick start (PDF): print it and keep it next to your keyboard.
- Quick start: install, sign in, link your model and render in about ten minutes.
- Credits, plans and the free trial: what each action costs.
- Your real products and your real materials.
- Paint colors and sheen.
- Lights: what is on in each scene.
- What is outside: the Environment tab.
- Scenes: rendering, light and the look.
- Fix, upscale and video.
- Projects, variations and client pages.
- Videos, compilations and the client page.
- When something goes wrong, plus Get help to open a ticket from inside the extension.
Frequently Asked Questions
Is there a free trial of FOCUSED AI Rendering?
Yes. A new account gets 25 credits for 7 days, whichever runs out first, with no card needed. During the trial you have every Studio feature, client pages included.
Does it work for exteriors and landscapes?
Yes. Each scene is set as Interior or Exterior. Exterior scenes get time of day, weather and season, shadows that follow the sun, and one shared site for the project, so every view of the house shows the same surroundings.
Will the AI change my design?
No. The SketchUp model is the truth: walls, openings, cabinets and furniture stay where you drew them, at the sizes you drew them. The AI finishes the picture with light, materials and detail from the photos you assigned.
Which versions of SketchUp does it work with, and do I need a powerful computer?
SketchUp 2026 and 2027, on Windows and Mac. Renders are made on our servers, so a regular design laptop is fine and no graphics card is needed.
How much does it cost after the trial?
The Render plan is $47 a month with 150 credits a month, and your first client project is free. Studio is $97 a month with 300 credits and client pages on every project. Yearly plans cost the same as ten months. FOCUSED AI Rendering is its own subscription and is not part of FOCUSED Pro.
Do I still need V-Ray, Enscape or a separate AI subscription?
No. The AI is built in and paid for with your credits, so you don't need ChatGPT, Magnific or another AI subscription to render, and several beta testers are moving off V-Ray and Enscape for their client renders.
For years the hardest part of AI rendering wasn't getting one beautiful picture. It was getting the same room twice. Put your products and finishes on the model once, render every view, and see if your next presentation looks like one design from start to finish. Your first 25 renders are on me.
Tags