Bridging the Gap: 7 Strategies for Sourcing and Creating 3D Components

The Product Gap is the disconnect between the physical products clients want to see in their spaces and what actually exists in the digital design world.
Key Takeaways:
- The "Product Gap" refers to the missing link between real-world products clients want and the 3D components available for design.
- Most designer-sourced or client-favorite products don’t exist as ready-to-use 3D models.
- Brands are hesitant to release models due to fears of misrepresentation, high costs, and file format limitations.
- Seven strategies can help designers bridge the gap and build more realistic, accurate scenes Combining these strategies can save time, improve visuals, and create a better client experience.
- The Product Gap may never fully disappear—but with the right tools, it’s manageable.
Table of Contents
*Affiliate links may be used throughout this article. Read our Privacy Policy for more information.
The Product Gap in Action
Clients shop retail—Pottery Barn, Restoration Hardware (RH), Arhaus—while designers often source from trade-only brands like Made Goods or Visual Comfort. That’s a huge spread of preferences and price points. And the kicker? Most of these products don’t have high-quality 3D components available. If they do, they’re often:
- Incorrectly scaled
- Missing textures
- Too detailed (hello, lag)
- Not detailed enough (hello, blob with legs)
So what do we do?
We compromise. We sub in “close enough” pieces. We model from scratch. We screenshot and Photoshop. We cross our fingers and hope the client doesn’t ask, “Is that really the table I picked?”
And this, my friends, is the core problem. The Product Gap slows down our workflow, introduces inconsistencies, and—most importantly—affects the client experience.
Let’s talk about why this gap exists in the first place.

My Top Picks!
Desktops for SketchUp
Download my FREE SketchUp and V-Ray Hardware Guide to get links to my favorite desktops for SketchUp!
Why the Gap Exists: Fear, Cost, and Access
Design brands—especially the premium and luxury ones—are incredibly protective of their digital presence. And that includes 3D models.
So why aren’t they making high-quality components more available?
Three main reasons:
1. Fear of Misrepresentation
Imagine spending thousands on marketing, design, and manufacturing, only for a SketchUp model to make your product look… wonky. Brands are terrified that an inaccurate model could misrepresent the quality of their product.
2. Cost of Production
It’s expensive to produce accurate, clean, well-textured 3D models. Multiply that by hundreds or thousands of SKUs, and the dollars add up fast.
3. File Format & Hosting Headaches
Different programs (Revit, SketchUp, Rhino, Blender, 3ds Max) require different formats. Making 3D models accessible across platforms adds another layer of technical complexity—and cost.
As a result, the onus falls back on us—the designers. We’re left to fill the gap. But here’s the good news: we can.
I’ve tested a lot of strategies over the past few years—through my design firm, Arched Manor, and through my courses in my FOCUSED SketchUp program. In this post, I’ll break down the 7 strategies I shared at the SketchUp 3D Summit to help you bridge the gap and build out better 3D scenes—faster, cheaper, and more accurately.
Let’s go!

Get My SketchUp Cheat Sheet!
A 2-sided PDF that you can print and reference as you learn and use SketchUp!
Strategy 1: Use the 3D Warehouse (But Smarter)
Yes, the 3D Warehouse can be a hot mess of legacy components and questionable geometry—but there’s gold in there if you know how to mine it.
Here’s how I search:
- By Exact Product Name
If I’m looking for the “Serena & Lily Balboa Counter Stool,” I type that in verbatim. A surprising number of uploads come directly from manufacturers or retailers. You can also try stripping words from the title as well to broaden the search. - By Collection Name
Can’t find the item? Broaden your search: try “Balboa Collection” or “Serena & Lily Stool.” You’ll often find variants or similar models that are usable or editable.
Use Image-Based AI Search
The AI Product Image Search was introduced in 2024 and makes the search results much more accurate, assuming you have a good, clean picture of your item to upload. Use the free chrome extension ImageEye to scrape the images from a webpage and download them to your machine.

Keep in mind: models in 3D Warehouse are free but vary wildly in quality. Check for:
- Geometry cleanliness
- Realistic textures
- Component nesting
- File size

PRO TIP: Make sure your product image isolates the product as much as possible, ideally with a white background. A corner shot is preffered over straight-on so the AI knows the overall shape of the object.
Strategy 2: Tap Into Asset Platforms
If 3D Warehouse doesn’t cut it, you can go deeper with professional 3D asset platforms. These usually come with a price tag—but they also offer higher-quality models.
Here are a few of my go-to platforms:
- TurboSquid – Massive library, especially for architectural elements.
- CGTrader – Slightly more affordable, great for modern furniture.
- BIMObject – Focuses on architectural elements with manufacturer-provided models.
- FOCUSED 3D Club – Yep, this is something we created! A curated library just for designers, with SketchUp-ready files and trade-brand items.
Be sure to filter for compatible formats—many of these sites lean toward .fbx, .obj, or .3ds formats, so you may need a conversion tool or plugin.
Strategy 3: Brand Websites (You’d Be Surprised!)
Some brands are actually starting to get on board with 3D—and they’re quietly rolling out download libraries on their own sites.
Here are a few brands that offer downloadable 3D files:
- Kohler – Most of their faucets, sinks, and tubs are available in .skp and .dwg
- Sub-Zero / Wolf – Excellent for appliance modeling. Bonus: they often include 2D CAD files for planning.
- Visual Comfort – Their SketchUp files are actually quite good, with clean geometry and scaled correctly.
Even if a brand doesn’t advertise 3D downloads, try emailing their support or trade team. You’d be shocked how many will send files on request.
Strategy 6: Use LiDAR Scanning (Yes, Seriously)
This one’s a bit more niche—but if you have the product in front of you, LiDAR scanning is a killer tool.
Apps like Polycam and KIRI Engine allow you to scan physical objects using your phone’s LiDAR sensor (iPhone Pro models or iPad Pro). The result is a textured 3D model that can be cleaned up in Blender or SketchUp. I really like the KIRI app for LiDAR scanning – very intuitive and easy to use. The only downside is that it does take a few steps to export, download, unzip, and import into SketchUp.

Is the 3D model created with LiDAR perfect? No. But for organic shapes like sculptures, custom chairs, or antique pieces—it’s a great shortcut.
Strategy 4: Model It Yourself (But Be Selective)
I know. This is the time-suck method. But if you can’t find what you need and need it done right, or if your shape is pretty basic and mostly right angles, building it yourself may be the best option.
A few modeling tips:
- Stick to straight-lined products—think casegoods, tables, and beds.
- Use manufacturer specs—dimensions are almost always listed online.
- Model in groups and components from the start.
- Apply textures last, using real fabric or wood swatches if possible.
Yes, this takes time—but it doesn’t cost a cent. And it’s a great way to improve your SketchUp skills and build a portfolio of custom assets.
Learn to Create These Renders in 7 Days
My 7-Day SketchUp Bootcamp for Interior Design will take you step-by-step from installing and configuring SketchUp, all the way to using V-Ray to create the photorealistic images you see below…all in 7 days!


Strategy 5: Outsource It to Freelancers
When you need a product that’s curvy, ornate, or just too time-intensive to DIY—hire it out.
Freelance marketplaces like Upwork, Fiverr, and freelancer.com are full of capable modelers. It does take some time to find one that you can trust to create accurate, high-quality models for a reasonable price, but once you find one, you can start offloading these modeling tasks and freeing up your time.
Here’s my freelancer workflow:
- Send product photos, dimensions, and key angles. Alternatively, send them a URL of the product page.
- Ask for native .skp format.
- Require the model be grouped and clean.
- Ask for a 1-3 day turnaround.
You’d be amazed how fast and professional these services can be once you find your go-to person.
PRO TIP: Lighting plays a huge role in the output quality of your scanned object. Try to get as even and consistent lighting as possible for your scan.
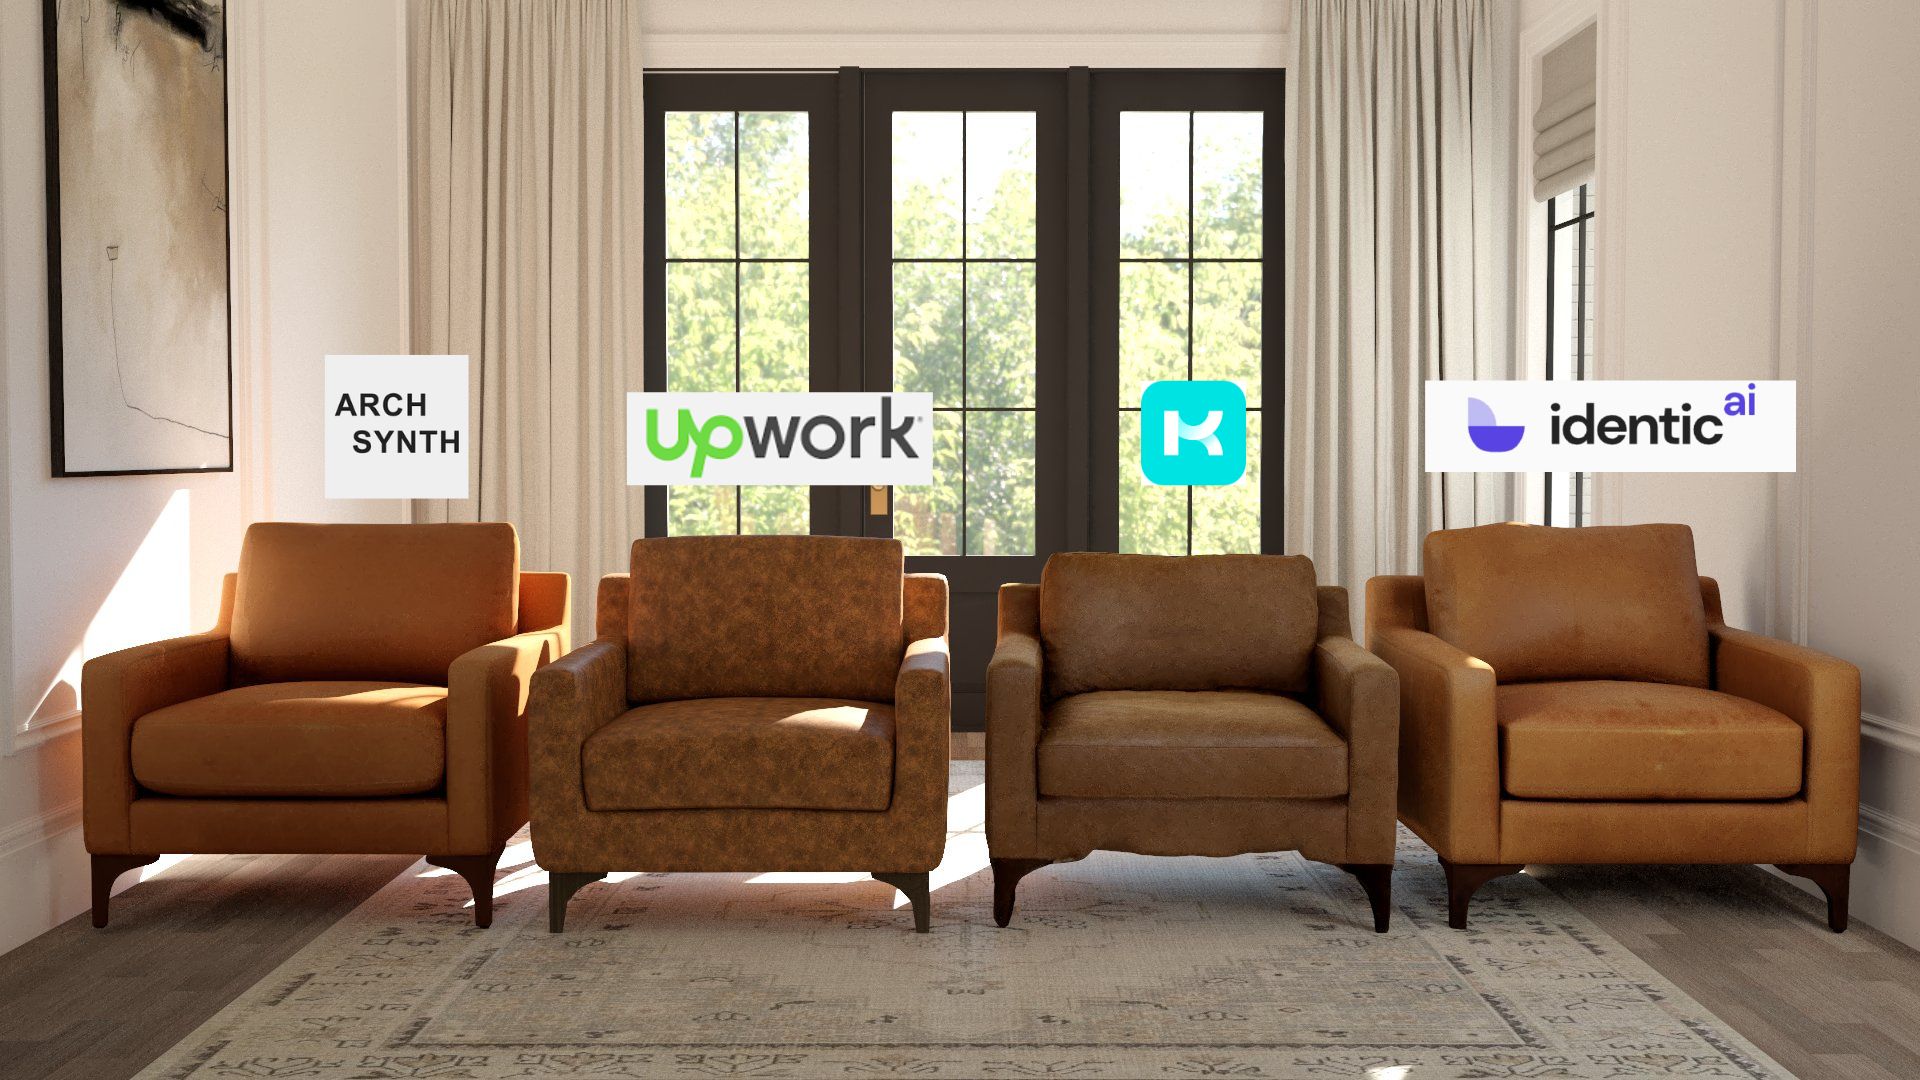
Strategy 7: AI Tools to Create 3D Models from Images
Okay, this is the coolest (and most futuristic) strategy. AI tools are beginning to allow you to upload a 2D photo of a product and receive a 3D model in return.
Here are some promising platforms:
- ArchSynth – Built specifically for architecture and interiors. Surprisingly good accuracy.
- Meshy.ai – Still in beta, but great at soft goods (like poufs or pillows).
- Identic.ai – Uses a more advanced image-learning system. Expensive, but promising.
These tools are evolving fast. They’re not perfect yet—but they’re a glimpse of what’s coming. In a year or two, we might be able to model a room’s entire contents from one panoramic photo.
Final Thoughts: The Product Gap Isn’t Going Away… But We’ve Got Options
The truth is, the product gap will always exist to some extent—brands won’t upload their full catalog anytime soon. But with these 7 strategies, we’ve got options. Real, practical options that save time, elevate our visuals, and—most importantly—help our clients see their dream spaces come to life.
This post was based on my talk at the 2025 SketchUp 3D Summit in Denver. If you were there, thanks for coming. If not, I hope this gave you some fresh tools and ideas to explore.
Let’s keep bridging that gap—one model at a time.

Ready to Learn SketchUp?
Check out my SketchUp & V-Ray courses to find the right one for your skillset and your design specialty. Online, self-paced, and lifetime access!
Tags