Where Did My Materials Go in SketchUp 2025? Here’s What You Need to Know About the New Material Panel

If you recently upgraded to SketchUp 2025 and opened a model only to find yourself wondering, “Where did my materials go?” — you’re not alone. I’ve been getting this question almost daily from designers, DIYers, and professionals inside my FOCUSED SketchUp courses, and I want to walk you through what’s changed — and how to make sense of it fast.
Let’s dive in, especially if you’re using SketchUp 2025 on a Mac.
Key Takeaways:
- The Materials Panel in SketchUp 2025 for Mac is now accessed through the Colors dialog via the Window > Materials menu.
- Use the “Colors in Model” option to view and manage all materials currently used in your project.
- SketchUp 2025 introduces photorealistic texture generation, making it more powerful for rendering workflows — especially when paired with V-Ray.
*Affiliate links may be used throughout this article. Read our Privacy Policy for more information.
Table of Contents
What Changed in SketchUp 2025?
The core functionality of materials in SketchUp is still there, but the location and layout of the Materials Panel has changed, particularly on macOS. In SketchUp 2025, materials are now managed through the Colors dialog — a new home that’s throwing many longtime users for a loop.
So, if you’re asking “Where is the Materials panel now?” — here’s your quick answer:
How to Access the Materials Panel in SketchUp 2025 (macOS)
- Open SketchUp 2025 on your Mac.
- Go to the Window menu in the menu bar.
- Select Materials.
This action opens the Colors dialog box, which now serves as your Materials panel. From here, you’ll be able to browse, create, sample, and manage materials in your model.

Navigating the New Material Panel
Here’s a breakdown of the key tabs and tools you’ll find in the updated interface:
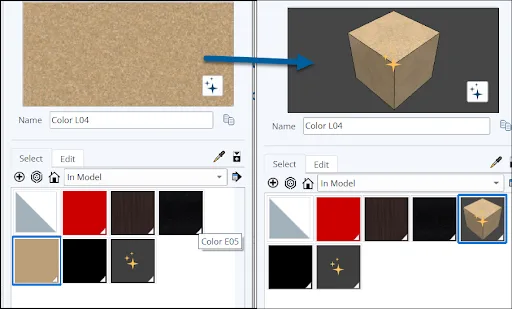
Select Tab
- This is your hub for applying and managing materials.
- Browse SketchUp’s built-in libraries, or search for new ones using the integrated 3D Warehouse access.
Create Material
- Make your own materials from scratch.
- Customize color, texture, reflectivity, and more.
Sample Paint Tool
- Click on a face in your model to sample its material.
- Reapply it anywhere else instantly.
Texture Palettes Tab
- Manage color palettes and view “Colors in Model” — this shows every material currently used in your project.
Generate Textures (New in 2025!)
This is one of the standout features of the update. You can now auto-generate high-quality texture maps like:
- Metalness
- Roughness
- Normal Maps
- Ambient Occlusion
This brings a much more photorealistic material workflow — and it’s especially powerful when paired with rendering tools like V-Ray (which I teach in my 7-Day SketchUp Bootcamp for Landscaping, Pools & Patios).
My Take on the Update
While the new panel layout might feel unfamiliar at first, the good news is that everything you used to rely on is still there — and then some. If you’ve taken any of my courses, you know I emphasize speed and clarity. Once you get comfortable with the new setup, this version actually offers more power under the hood — especially if you’re producing photorealistic renders or working with complex material libraries.
Still Stuck? Try These Next Steps
If you’re still having trouble adjusting, or just want to fast-track your workflow:
- Join one of my FOCUSED SketchUp + AI courses tailored to your niche:
- Access updated video tutorials inside the course dashboard
- Post your question in our private Facebook student group — I answer questions there almost daily
- Download my updated Printable Cheat Sheet, available to all enrolled students, or use the button in the next section to snag it.
FAQs
Why did SketchUp 2025 change the Materials panel?
The shift to the “Colors” dialog aligns better with macOS design standards and lays the groundwork for more advanced features like photorealistic texture generation.
Can I still use my old custom material libraries?
Yes, you can still import and manage custom materials. Look under the “Select” tab and scroll to the bottom where you’ll find “Open or Create Collection.”
What’s the best way to generate photorealistic materials?
Use the Generate Textures feature in SketchUp 2025. For best results, combine that with V-Ray rendering — which I teach step-by-step inside my 7-Day SketchUp Bootcamp for Landscaping, Pools & Patios
Is this different on Windows?
Yes — while the core features are similar, the interface on Windows remains closer to previous versions. I provide separate training for both platforms inside every course.
Where can I get help if I’m still confused?
Join one of my courses for personalized guidance, download packs, and full support:
SketchUp 2025 is powerful, and this new Materials Panel — while initially confusing — is a step forward once you get the hang of it. Whether you’re modeling a custom kitchen, a dreamy landscape, or your next client’s primary suite, I’ve got you covered with step-by-step training that keeps your workflow smooth and your designs beautiful.
Tags